DIGITAL TRIPLETS

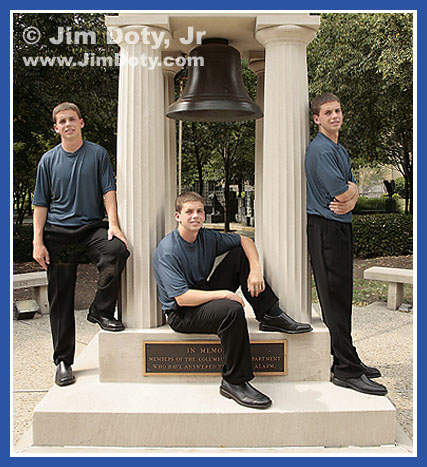
Three of Ryan. Photo © Jim Doty Jr.
If you do everything right during the shoot, it is pretty simple with digital photography to put one person in more than one location in the same photo, provided the light source remains constant. It didn't take much longer to composite the above photo in the computer than it did to set up and shoot in the first place. Working on the tiny details of the photo took a lot longer than compositing three photos together.
To keep things simple, the camera must be on a strudy tripod. Compose to allow a little more room in the final picture than you think you will need. Meter manually and focus manually. Don't change anything between exposures and don't bump the tripod or you will have to start over.
Make sure while you are shooting that your subject isn't in overlapping locations unless you want a ghostly affect, or the very time consuming editing job of having your subject in one location that is behind another location. It looks nice, it just takes a lot more work, time, and skill to layer mask or erase the layers so it looks right when you are all done.
I took serveral exposures of Ryan on the left with slightly different poses. Then several more with Ryan on the right and in the middle. We had to work quickly since thin clouds were moving across the sun and the light was changing a little. You can see more defined shadows on the left than the right due to the movement of the clouds between photos.
If our light source had been more constant and given us more time, Ryan could have changed clothes so he would be wearing a different outfit in each location.
When I got home, I picked one photo of Ryan in each location. These will each become a layer in my composite image with layer A on the bottom and layer C on top.
I began with the photo of Ryan on the left (which will become layer A). Then I took the photo of Ryan on the right (which will become layer B), and SELECTED the whole photo in Photoshop, clicked the MOVE tool, and did a SHIFT-click-drag to pull layer B over layer A. Holding down the SHIFT key in Photoshop while doing the click-drag insures that the two photos are perfectly aligned after one is moved over the other.
I created a layer mask with layer B and began erasing the left side of layer B to reveal Ryan underneath in layer A. The layer mask allows you to go back and un-erase and re-erase if you erase too much. If your software doesn't allow layer masks, use the ERASER tool, work carefully and save often so you don't have to start all over if you make a mistake. I made sure that I erased enough of layer B so that Ryan's shadow was also included.
I didn't want to double erase (although that wouldn't be terribly difficult to do), so I took the photo with Ryan in the middle (which will become layer C) and I used the LASSO tool to draw a SELECTION around Ryan and his shadow. I made the selection a little bigger than I needed to so there was some room for error. Using the MOVE tool, I did a click-drag to bring my selection (layer C) on top of layers A and B. When layer C was close to being in place, I changed its opacity so I could see the layers underneath. Then I made sure that layer C was exactly aligned with the other layers by using the up-down and left-right arrows to move layer C one pixel at a time. When it was perfectly aligned, I changed the opacity of layer C back to 100%.
I turned layer C into a layer mask and I erased the excess edges so that everything looked just right. Then I saved the whole thing with the layers intact before flattening the image and tweaking with LEVELS before preparing the image for the web. Preparing the fine details of the layered photo for a good print took a lot longer than compositing the three layers in the first place.
This is all fairly simple to do with a little practice and experience and some basic software that allows levels and has an eraser or layer masks.
You can do this with film, but you will need to scan each image with exactly the same scanner settings, and it will take more time to align each layer.