| |
Saturday, October 29, 2005
PHOTO OF THE DAY: THE PATH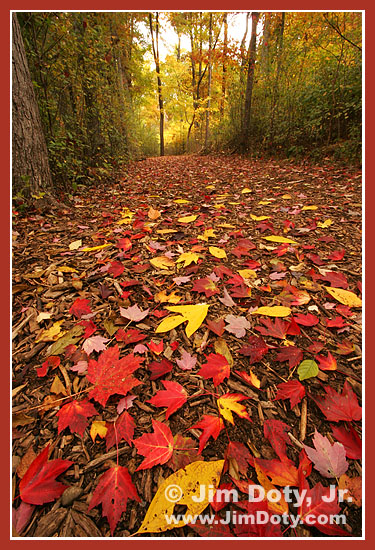 The Path, West Lake Nature Preserve. Portage, Michigan. Photo copyright (c) Jim Doty, Jr. The Path, West Lake Nature Preserve. Portage, Michigan. Photo copyright (c) Jim Doty, Jr.Michigan has some of the most splendid fall color in the country. Maple trees turn orange, red, and crimson, and fill the hillsides with glorious color. My favorite places in Michigan to film fall color are in the U.P. (upper peninsula) and the northern part of the mitten (just draw a line from Traverse City to Alpena and drive anywhere within 50 miles north or south of the line). Farther south, the West Lake Nature Preserve (WLNP) is a little piece of wilderness right in the middle of Portage, Michigan (just south of Kalamazoo). There is something to film there almost any time of year. WLNP is one of my favorite places to take photos. Earlier this week I took the above photo on one of the WLNP walking trails. It was cloudy and the forest was filled with soft light. The trail was covered with recently fallen leaves. The camera is on a tripod and quite low to the ground. I used a wide angle lens and a small aperture to maximize depth of field. Canon 20D. Canon EF-S 10-22m lens at 10mm (equivalent to 16mm in 35mm film terms). Aperture: f/22, shutter: 1.6 seconds.
Saturday, October 22, 2005
PHOTO OF THE DAY: HOUSE FIRE House Fire. Columbus, Ohio. Photo copyright (c) Jim Doty, Jr. House Fire. Columbus, Ohio. Photo copyright (c) Jim Doty, Jr.It was cloudy and raining when I took this photo so I set my camera at ISO 400 to give me a small enough aperture for enough depth of field plus a shutter speed fast enough to keep from blurring the fire. The brightness of the flames can fool the camera meter so I set my camera on manual and did a "substitute gray card reading" off of the back of my hand and opened up one stop (my hand is one stop lighter than an 18% gray card). The camera, lens, and I got wet but the photo was worth it. Most modern cameras and lenses can survive a little rain. Of course you takes yours out in the rain at your own risk. As you can see, the house was a total loss.
Canon 20D digital camera. Canon EF 70-300mm DO IS lens at 300 mm with image stabilization turned on. Shutter: 1/125, Aperture: f/10.
Thursday, October 20, 2005
CANON 20D COLOR INFRARED PHOTOGRAPHY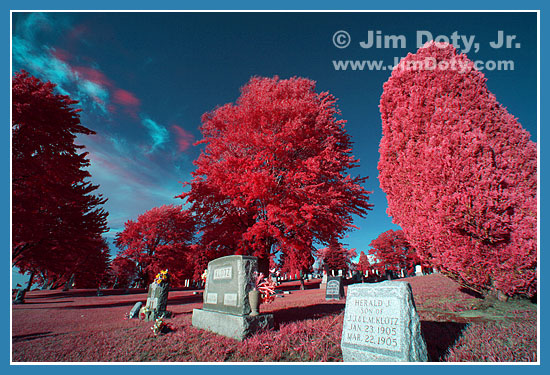 Canon 20D Color Digital Infrared. Photo copyright (c) Jim Doty, Jr. Canon 20D Color Digital Infrared. Photo copyright (c) Jim Doty, Jr.Color infrared photography with film and filters can yield some wonderful and oddly colored images, but the significant complications involved kept most photographers from delving into the infrared realm. Kodak Ektachrome EIR is great stuff but hard to work with. Fortunately, it is much easier to do color infrared photography with a digital camera. Now you can have the fun of doing color infrared photography without all the hassles. Despite a lot of internet reports to the contrary, it is possible to do both color and black and white infrared photography with the Canon 20D and 10D (and a number of other digital cameras). Black and white infrared photography is relatively simple. In addition to a camera and lens, all you need are a Hoya R72 filter, a tripod, and some basic (under $100) image editing software. Information on how to do this was the subject of a prior post (October 10, 2005) and is now an article on my website. To do color infrared photography the equipment is the same, but the imaging editing software must be able to handle RGB color channels and LAB mode. Adobe Photoshop will do this (along with several other kinds of software) but Photoshop Elements will not. 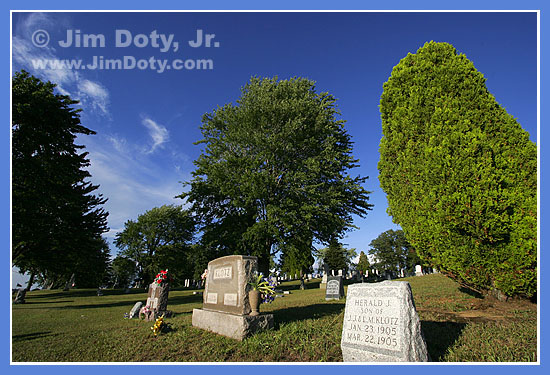 Original color image to be combined with a matching infrared image. Original color image to be combined with a matching infrared image.
Photo copyright (c) Jim Doty, Jr.Taking the photo is the same as for black and white infrared, except that two identically registered photos must be taken. Immediately before or after taking the infrared image with the Hoya R72 filter, a normal color photo should be taken. The camera should be on a tripod and the aperture for both photos needs to be the same. Except for the filtration, both photos should be identical. The two images will be combined later in the computer. 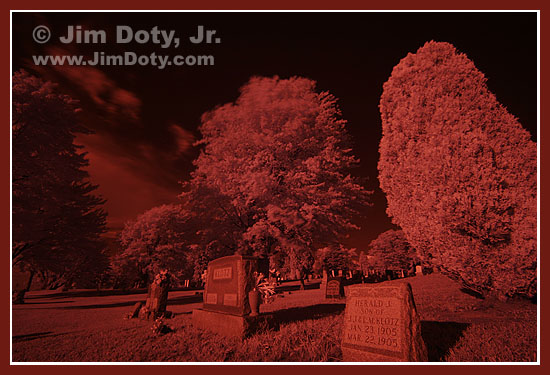 Original infrared image to be combined with a matching color image. Photo copyright (c) Jim Doty, Jr. Original infrared image to be combined with a matching color image. Photo copyright (c) Jim Doty, Jr.Open both images in Photoshop (or the image editing software of your choice). Begin with the normal color image. Select the entire image (CONTROL-A). Choose channels and click to select the green channel. Copy the green channnel (CONTROL-C). Select the blue channel and paste in the information from the green channnel (CONTROL-V). Select and copy the red channel (CONTROL-C). Select the green channel and paste in the red channel information (CONTROL-V). What you have accomplished is to move the red channel info to green and the green channel info to blue. Select (click on) the infrared image and select the entire image (CONTROL-A). Choose the red channnel and copy it (CONTROL-C). Go back to the normal color image and choose the red channel. Paste the infrared red channel into the color red channel (CONTROL-V). You now have a color image much like Kodak Ektachrome EIR with reddish-magenta vegetation and those unusual blue skys (top image of this post). Note that the movement between the color and infrared photos resulted in non-registered sets of aqua-blue and pink clouds. You can use LEVELS and HUE/SATURATION to tweak the final image. Experiment by moving the color channel information to different channels than the ones I suggested above. 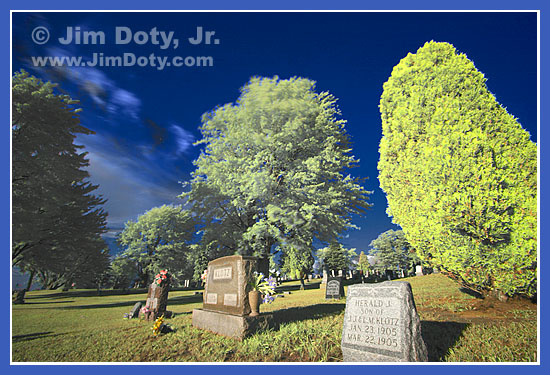 Digital infrared image from combined infrared and color images. Photo copyright (c) Jim Doty, Jr. Digital infrared image from combined infrared and color images. Photo copyright (c) Jim Doty, Jr.The digital infrared image immediately above was processed from the same color and infrared images, but in a diffeent way. Open both images in Photoshop. Convert the normal color image from RGB to LAB mode. Go to the infrared image, and select the whole image (CONTROL-A). Choose the red channel and copy it (CONTROL-C). Go back to the color image and choose the LIGHTNESS channel. Paste the infrared red channel into the color LIGHTNESS channel (CONTROL-V). Now convert the color image from LAB mode back to RGB and tweak with LEVELS and HUE/SATURATION. The result is another rendition of color infrared that is unusual but less over the top. 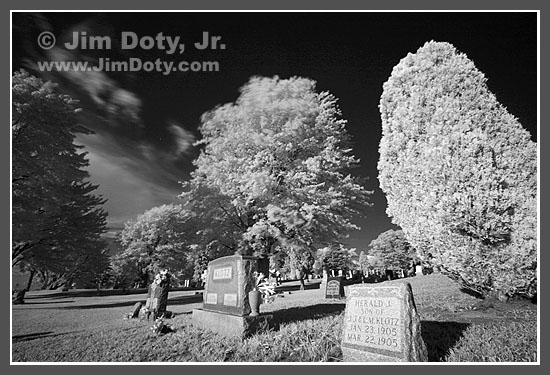 Black and white infrared image. Photo copyright (c) Jim Doty, Jr. Black and white infrared image. Photo copyright (c) Jim Doty, Jr.An infrared image right out of the camera looks red until it is processed into a black and white infrared image. This is what the original infrared image looks like as a black and white infrared image. 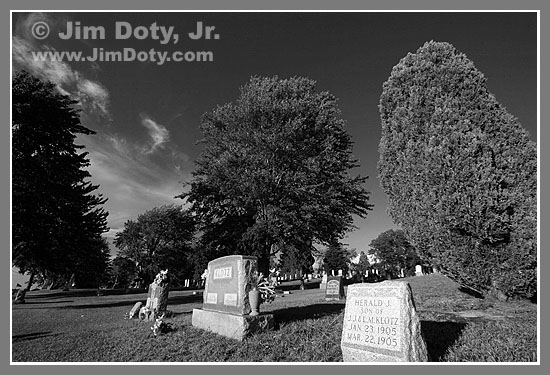 Color to normal black and white. Photo copyright (c) Jim Doty, Jr. Color to normal black and white. Photo copyright (c) Jim Doty, Jr.For the sake of comparison, the black and white image above was processed from the original color image. It is quite different from the infrared black and white image.
2nd LOOK: Canon EF 24-105mm f/4L lens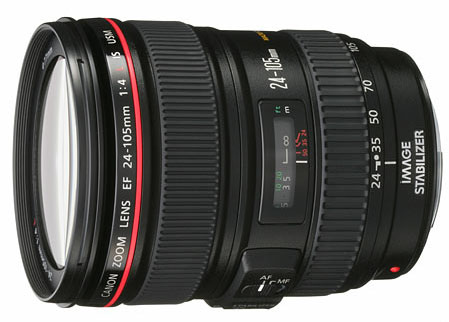 Canon EF 24-105mm f/4L IS USM lens Canon EF 24-105mm f/4L IS USM lensI first wrote about this lens when it was announced last August. Enough reviews have been posted to give this lens a second look. The news is very good. Read more at my article here.
Tuesday, October 18, 2005
FALL COLOR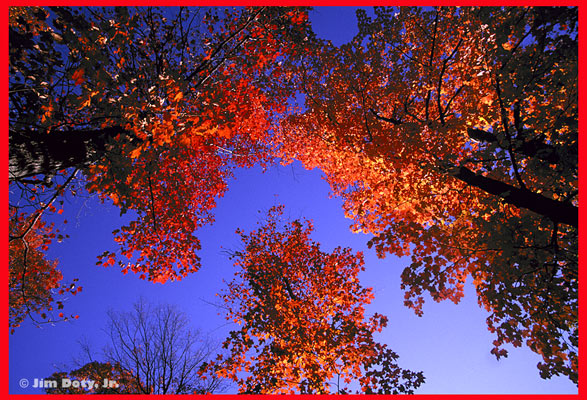 Fall Maples Leaves,l Michigan U.P. Photo copyright (c) Jim Doty, Jr. Fall Maples Leaves,l Michigan U.P. Photo copyright (c) Jim Doty, Jr.The fall color season is here. I caught some great color in Colorado a couple of weeks ago before the wind and snow stripped many of the trees at higher elevations. According to recent reports, there is still some excellent color in some locations in the San Juan mountains of southwest Colorado. There are also some great locations in the Eastern Sierra of California. The peak of fall color is working its way across Michigan's Upper Peninsula. Peak color is still one to two weeks away in much of the lower peninsula of Michigan. There is great color to be found in some places in New England. Over the next few weeks, color will continue to work its way south. You can track and find the color from fall color links at my website. Happy Shooting!
Friday, October 14, 2005
MEMORY CARD QUESTIONS Antelope, South Park, Colorado. Photo copyright (c) Jim Doty, Jr. Antelope, South Park, Colorado. Photo copyright (c) Jim Doty, Jr.Recently I was asked two questions about brands, reliability, and speed of memory cards for use in digital cameras. The Q&A follows. Q. I have been searching for places online that will give me some good info on what kind of memory card(s) to purchase if and when I take the plunge with a Canon Rebel XT, and I'd appreciate some help from you. I usually shoot at air shows, static and flying subjects, in the hopes that a few images can be culled to be enlarged to 8x10s.
When it comes to figuring out what kind of memory card to buy, I am on sensory overload. High speed? Flash cards? 512 mb, or 1 gig? I don't need infinite memory, but would like the option to exploit the XT's 3 fps feature as high-priced aircraft streak overhead. Any insights you can offer will be greatly appreciated.A. I use Lexar and SanDisk CF (CompactFlash) cards and I have had no problems with them. They are both well respected brands. I have had problems with other brands. The faster versions of these cards do work a little faster in some of the more recent cameras. I can't say if that would be true for the Digital Rebel XT. Personally, I don't think it is worth the money to buy the fastest cards out there. The size card you use (in terms of memory) is a matter of personal taste. It is a choice between how often you want to change cards, versus how many photos you are willing to risk. Bigger cards mean less card swapping. BUT, like all electronic devices, memory cards will eventually fail. The bigger the cards you use, the more photos you risk if a card fails and you can't retrieve the photos. I do check my LCD from time to time to make sure all is ok, but that is no guarantee. I took a few photos at the end of a personal shoot using an off brand microdrive. Everything looked ok on the LCD. The next day, the camera couldn't write to the microdrive and the prior day's photos (not too many fortunately) were not recoverable. I tend to use mostly 1-GB CF cards. For critical stuff, I use two cameras so if one card dies, I have similar photos on another card in the other camera. If you will burn your photos to a CD, the photos on one 512 MB CF card will burn nicely to one CD. If you will burn your photos to DVDs, you can burn the photos on four 1-GB cards (or two 2-GB cards) to one DVD. This may be of less importance than the other considerations mentioned above. Q. You mentioned in your previous answer to me that you used Lexar and Sandisk products. Well, now that I am focusing on this aspect of digital photography, I see myriad choices. While I understand the difference between 256mg and 1 gig, what confuses me is the difference between standard speed, 40X high speed and 80X high speed. Of course, the prices go up accordingly. But what exactly does the "speed" and the 40X and 80X mean when the subject is media cards? Thanks again for your help.A. 1x is usually defined as a write speed of 150 kB/s. Therefore, 20x, 40x and 80x cards should be able to record data at around 3 MB/s, 6 MB/s, and 12 MB/s respectively. The catch is that is the speed at which the CARD can receive and record data, not the rate at which any given CAMERA can send data to the card. A Digital Rebel or a Canon 10D don't write any faster to a fast card than a slow card due to the camera technology. A Canon 20D can write faster to a faster card, but not fast enough to make an 80x card worth the money, at least not for me and the way I take pictures. Since most cameras have a buffer, you can take pictures as fast as you want and the card speed doesn't matter so long as you don't fill the camera buffer. Once the buffer is full, the write speed of the camera to the card becomes important, as well as the speed the card can receive data. In real world use, I don't see much difference in using a 20x versus a 40x card in my Canon 20D, but that is because I rarely fill the buffer, even in fast sporting events. I rarely need to shoot 23 or more photos as fast as the camera will go. Will an 80x card have an advantage over a 40x card? Only if you fill your camera's buffer, and then the write speed of the camera is more of a factor than the speed of the card. So the advantage is less than the numbers would indicate. The same is true for 20x and 40x cards. I use both and the "real world" advantage of the faster cards is less than the "theoretical" advantage the numbers would indicate. I am happy with either.
Monday, October 10, 2005
O'HAVER LAKE IN INFRARED LIGHT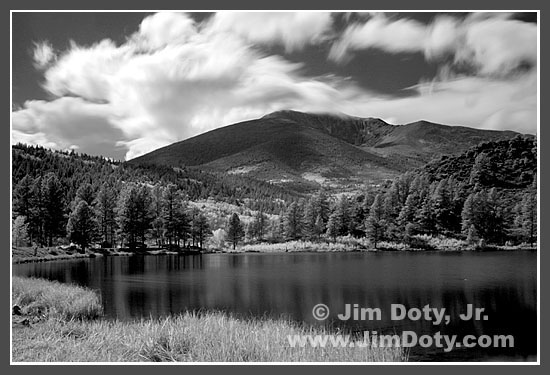
O'Haver Lake and Mt. Ouray (Colorado) in infrared light. Canon 20D digital camera with Hoya R72 filter. Photo copyright (c) Jim Doty, Jr.It is possible to capture infrared images with the Canon 20D, the Canon 10D, and a number of other digital cameras that aren't specifically designed for infrared photography. Although many of these cameras have an infrared cut-off filter to eliminate infrared light from reaching the sensor, with the right filter, enough infrared and/or near infrared light gets through to make this kind of photo possible. It works better with some digital cameras than others (and won't work at all with some). 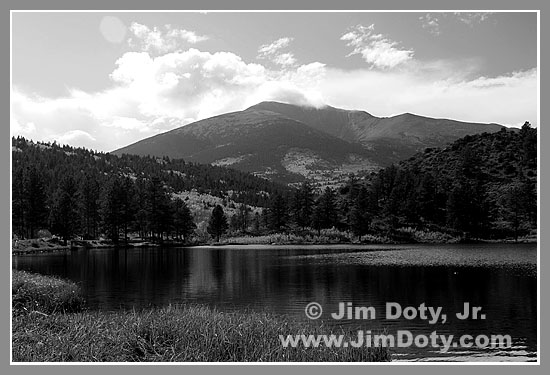
O'Haver Lake and Mt. Ouray (Colorado) in Black and White.
Photo copyright (c) Jim Doty, Jr.Infrared black and white photography has a different look than regular black and white photography. Compare the two images above. The second image is a straight forward black and white image which was converted from the color image at the end of this post. Subjects that emit infrared light are recorded as white or light tones and subjects that emit very little or none are recorded as black or dark tones. In infrared light, blue skys look very dark and vegetation records as light to very light tones. In straight black and white photography, blue skys and vegetation record as shades of gray unless some kind of filtration is used. To do infrared photography with a Canon 10D or Canon 20D camera (or one of the other digital cameras that can do this), use a Hoya R72 infrared filter. These are expensive (around $275 in a 77mm size). Set the camera on a tripod, compose, and focus before you put the filter on the lens. The filter is so dark that you won't be able to see through the viewfinder. Exposures are long. On a bright, sunny day, start with ISO 100, f/8 and 30 seconds and bracket exposures from 15 seconds to 1 minute. The resulting image will be red on the LCD viewing screen. Transfer the image to your computer, use Photoshop, Photoshop Elements, or some other image editing software to remove the red caste (desaturate the image). Then use "levels" to tweak the contrast. If you did everything right and picked a good subject, you now have a dramatic, black and white infrared image! Do a search on the internet to see if you can do digital infrared photography with your camera. If you can, digital black and white infrared photography is a lot less fuss and bother than infrared film. With infrared film, you had to take a lot of extra precautions which included opening the film canister, loading and unloading the camera, and putting the film back in the cannister, all in absolute darkness. Ah, the good ol' days. 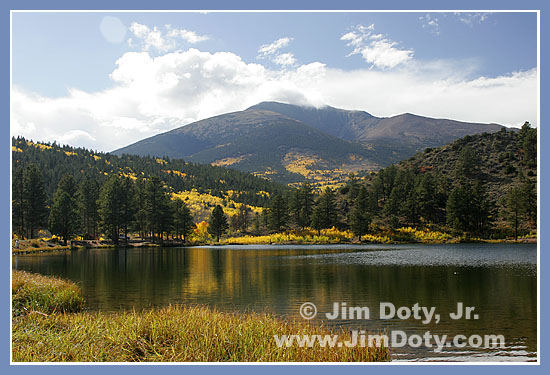
O'Haver Lake and Mt. Ouray (Colorado) in Color.
Photo copyright (c) Jim Doty, Jr.
Sunday, October 09, 2005
LONG'S PEAK REFLECTION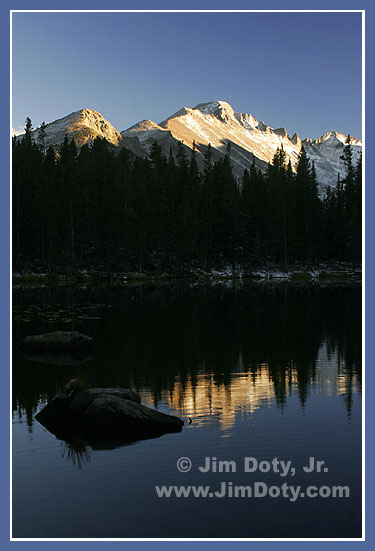 Long's Peak Reflected in Nymph Lake, Rocky Mountain National Park, colorado. Long's Peak Reflected in Nymph Lake, Rocky Mountain National Park, colorado.
Photo copyright (c) Jim Doty, Jr.It was late in the day and the last bit of sunlight was disappearing as shadows of other mountains crept up the side of Long's Peak. I tried several locations on the shore of Nymph Lake and chose one which would show the rippled reflection of Long's Peak along with a rock in the water to add a foreground center of interest at lower left to balance the mountain ridge at the upper right. Canon 20D. Canon EF 28-135mm lens at 28mm. Aperture: f/16, shutter: 1/5 second.
Saturday, October 08, 2005
THE FALL ELK RUT, RMNP, COLORADO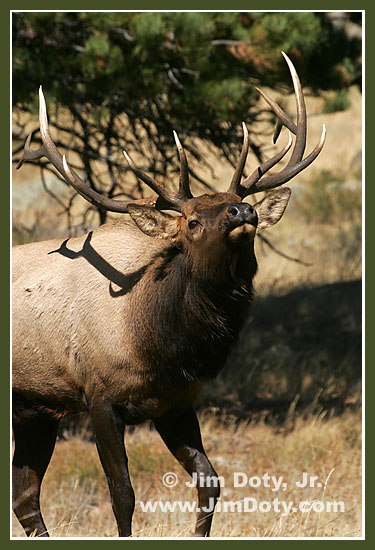 A bull elk struts his stuff, Rocky Mountain National Park, Colorado. A bull elk struts his stuff, Rocky Mountain National Park, Colorado.
Photo copyright (c) Jim Doty, Jr.If you go to Rocky Mountain National Park during the fall rut, you are almost guaranteed to see large herds of elk. The rut begins in early September and ends in mid-October. The last week or two of September through the first week in October is a good time to go to see both elk at their best and fall color. The elk are usually back in the trees during the day. In later afternoon to early evening, they come out into the meadows and the show begins. Large mature bucks have gathered their harems while younger bucks try to steal a cow or two. The big bucks run them off. Bugling is a delight to the crowds that gather to watch the spectacle. Visitors line the roads near the largest herds, sometimes clogging the roads in "elk jams". It's easy to find the elk, just head out in the evening and look for all the cars. The best places to look are in Moraine Park, Beaver Meadows, Horseshoe Park, and Hollowell Park. Refer to the park map, these locations aren't far apart and you can check out several in an evening. 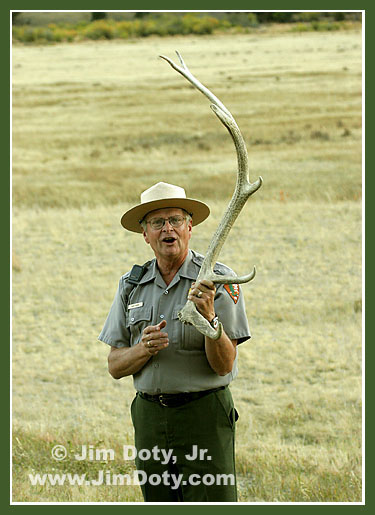 "Ranger Don" give his classic elk rut evening talk. Photo copyright (c) Jim Doty, Jr. "Ranger Don" give his classic elk rut evening talk. Photo copyright (c) Jim Doty, Jr.To learn about the elk rut, go to one of the evening ranger talks. Details are in the park newsletter that you receive when you drive in, or ask at one of the visitor's centers. I will give you just a fews of the highlights. It takes a lot of work to attract and hold a harem. First of all, elk need a big and impressive set of antlers. The antlers get bigger with each passing year. Older elk have the biggest racks. Elk need to smell good to the cows, so they douse themselves with "elk cologne." That is a euphemism for elk urine. A bull elk has the interesting ability to control the spray from a wide, fine mist, to a narrow focused stream. When you see a big bull with his belly heaving up and down, he is spraying a fine mist of urine all over his belly. Then he lowers his head between his front legs and hits himself in the head with a narrow stream. What a stench. You will know it when you to smell it. The cows love it. Go figure. 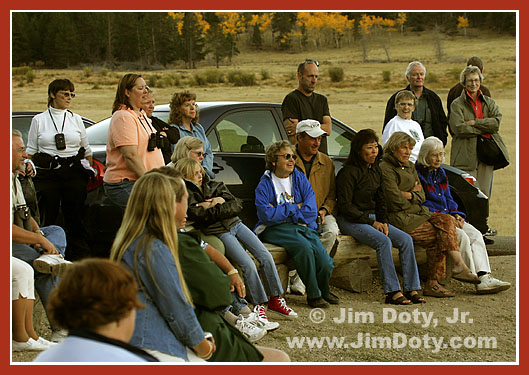 A group of park visitors is surprised to learn some of the details about the elk rut. A group of park visitors is surprised to learn some of the details about the elk rut.
Photo copyright (c) Jim Doty, Jr.Bulls also need to look big and dark. Size again comes with age, but the bulls help themselves out a bit by going to the "elk spa." They roll in the mud to coat themselves. The caked on mud makes them look bigger and darker, another plus with the cows. It isn't hard to find mud to wallow in, they can always make their own. You guessed it. More smell. Sound comes into play too. The more impressive the bugle, the better. Once again, the older, bigger bulls have the advantage. The younger bulls sound puny by comparison. Elk bugling can't really be described. A recording will give you something of an idea but you need to hear it in person to really appreciate it. There is nothing quite like that sound on a crisp fall evening. Bigger bulls can often intimidate smaller bulls with a look or a bugle. Sometimes they chase them away. With bulls closer in size it can come down to a pushing match, antler to antler. Sooner or later one pushes the other away. If the loser falls, it can be fatal. Big bulls are mean and will gore a fallen bull. The average bull hide at the time of death has 30-50 gore marks. 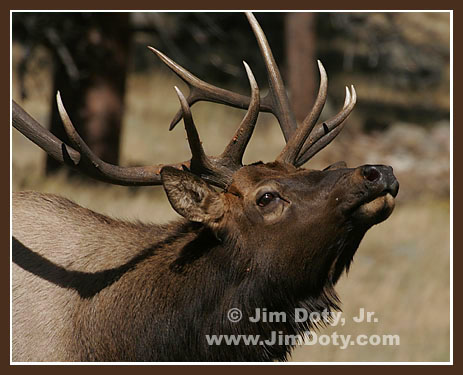 A bull elk right after running off some younger bulls, Rocky Mountain National Park, Colorado. A bull elk right after running off some younger bulls, Rocky Mountain National Park, Colorado.
Photo copyright (c) Jim Doty, Jr.All the work of impressing and protecting a harem for 6 weeks is hard on a bull. They can lose 1/3 of their body weight during the rut. Many of them die over the winter. At birth, males slightly outnumber the females. A few years later, there is only 1 male for every 3 females. A few years later and the number of males is a small fraction of the number of females. Life is hard on the bulls. The ranger drew a few parallels between bull elk and human males. Surely this isn't a fair comparison. After all, human males don't try to attract females by being impressive (fancy cars?), smelling good, looking buff, darkening their skin (tanning), or sounding good! Photographing the elk usually means low light. That means higher speed films or higher ISO digital settings. ISO 400, 800 or even 1600 is not unusual as it gets darker and darker. If you are lucky, the elk will be out during the day after a sudden drop in tempreature or a change in the weather. That is what happened this week while I was there. Elk are dangerous! Stay on the road and don't approach them. I heard a very foolish woman say "They're so tame" as she walked up to a young bull. Dumb. As someone once said, "Bull elk have two things on their mind in the fall, and you don't want to be on the receiving end of either one." The elk rut is quite a show and swarms of visitors come to RMNP in the fall to watch. Why not join them? 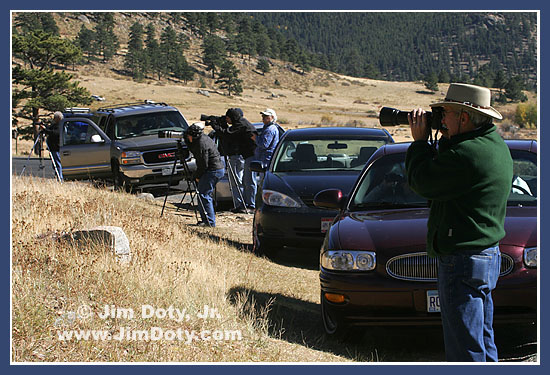 Photographers take advantage of a rare daytime opportunity to film a large herd of elk. Photographers take advantage of a rare daytime opportunity to film a large herd of elk.
Photo copyright (c) Jim Doty, Jr.
Friday, October 07, 2005
MARSHALL PASS ROAD, COLORADO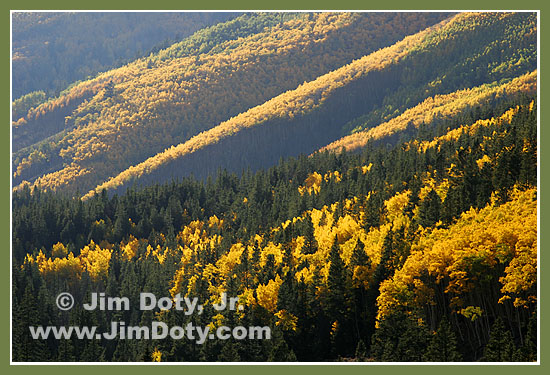 Aspen, Marshall Pass, Road, Colorado. Photo copyright (c) Jim Doty, Jr. Aspen, Marshall Pass, Road, Colorado. Photo copyright (c) Jim Doty, Jr.A prior post featured a photo from Marshall Pass Road in Southern Colorado. This is one of the most beautiful drives in Colorado if you are looking for fall color. When I was growing up, my family would go camping several times a year at O'Haver Lake, south of Poncha Springs. I would watch the rare vehicle drive by on the road up above the lake and wonder where the road went. It wasn't until I was married and had children of my own that we decided to find out. We drove the Marshall Pass Road for the first time. That must have been over 20 years ago. We were stopped before we reached the top by 20 foot snow drifts across the road. A second attempt a year or two later was successsful since we waited late enough in the summer for the snow to have melted. It has been a favorite drive of mine ever since. 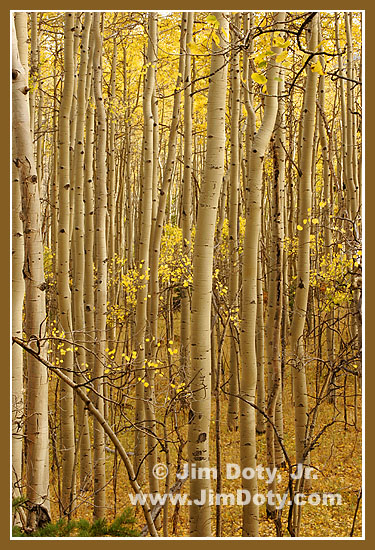 Aspen, Marshall Pass, Road, Colorado. Photo copyright (c) Jim Doty, Jr. Aspen, Marshall Pass, Road, Colorado. Photo copyright (c) Jim Doty, Jr.There are large stands of aspen at what seems like every turn in the road. It is a beautiful drive in the fall as the aspen turn gold. It is a good drive any time from mid-morning to late afternoon. Going from east to west, Marshall Pass Road leaves U.S. 285 a few miles south of Poncha Springs (take the O'Haver Lake Road, and then take Marshall Pass when the road splits). It crosses the Continental Divide on the south slopes of Mt. Ouray and connects with U.S. 50 at Sargents, Colorado. The road is passable (once the snow melts) by any passenger car or truck. 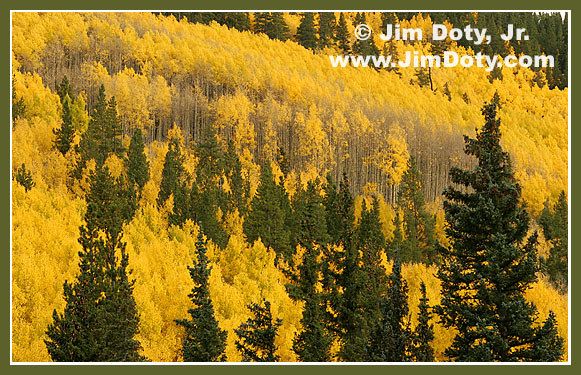 Aspen, Marshall Pass, Road, Colorado. Photo copyright (c) Jim Doty, Jr. Aspen, Marshall Pass, Road, Colorado. Photo copyright (c) Jim Doty, Jr.
Thursday, October 06, 2005
BE READY Coyote near Bear Lake Road, Rocky Mountain National Park, Colorado. Coyote near Bear Lake Road, Rocky Mountain National Park, Colorado.
Photo copyright (c) Jim Doty, Jr.Years ago, I read a book by Erwin Bauer that recommended having a camera and long lens ready to go when you are in locations that might provide brief opportunities to photograph wildlife. Not long after that, I was driving across the Texas panhandle and a coyote stopped right next to the road. I pulled over and looked at it and it stared at me for 10-15 seconds before it took off. I would have had a nice picture if my camera was ready, but it was zipped up in my camera bag. Not enough time to get it out before the coyote disappeared. Recently, I was in Rocky Mountain National Park, a prime wildlife location. My camera and long lens were laying on the car seat, ready to go. I spotted a coyote hunting near the road to Bear Lake. I pulled over, grabbed my camera and lens and took the above photo, one of seveeral before the coyote ran off. I have this photo only because I was ready for such a moment. As the Boy Scouts say, "Be Prepared." I didn't get my coyote photo in Texas years ago, but I did in Colorado. If you like to photograph wildlife, be ready when you are in a potential wildlife location. You might thank me some day. One more thing, Thank you Erwin Bauer!
Tuesday, October 04, 2005
BIGHORN SHEEP, HORSESHOE PARK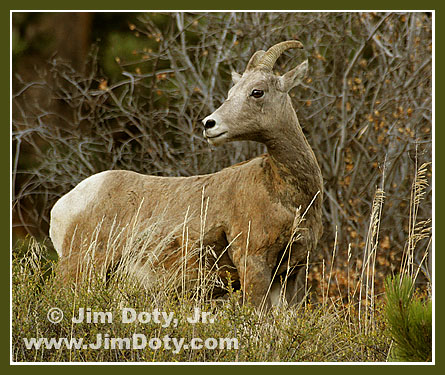 Bighorn Sheep Ewe, Horseshoe Park, Rocky Mountain National Park, Colorado. Bighorn Sheep Ewe, Horseshoe Park, Rocky Mountain National Park, Colorado.
Photo copyright (c) Jim Doty, Jr.Horseshoe Park is the most convenient place in Rocky Mountain National Park to see bighorn sheep - if they show up. Sheep Lakes at the east end of Horsehoe Park are high in mineral content and sheep come down periodically to "get their vitamins." This happens most frequently in the summer, but even in the summer this may only occur only a few times a week and they may not stay around long. A few years ago I met a professional photographer who had been at the Sheep Lakes viewing area every day for almost a week and had not spotted one sheep. On the last morning before he had to fly home (the day I happened to arrive) he decided to give it one more try. He showed up and over 40 sheep were there. He was overjoyed with his good fortune. So was I. This summer I spent three days in the Park and didn't see one sheep. One frustrated visitor, pretending he was the director on a movie set, yelled out "Cue the sheep." Part of the problem this summer was the presence of coyote's in the area. I saw one or more coyote's every day. The bighorn sheep were reluctant to come down to the lakes and risk the danger to their lambs. Bighorn sheep have one basic instinctive response to danger, climb fast and high. Unfortunately, that response leaves the young lambs behind and unprotected. Sheep sightings are more rare in the fall. They still come down to the lakes but less often than in the summer. When I arrived yesterday afternoon, I was quite pleased to see two ewes and two lambs. They weren't very big in my viewfinder. A man came up to me and asked if they were elk. I told him they were bighorn sheep. Then he proceeded to tell his son that they were two rams and two lambs since the female's don't have horns. Actually the ewes do have horns. Only the males get the big full curl. It was obvious when they wanted to cross the road and head back up the mountain. The rangers stopped traffic to let them cross. The good news is that they climbed only a small ways above the road and paused to feed in the grass, giving everyone there a chance at some nice photos (see above). Shutters fired like crazy. The sun had set by the time they crossed the road, so I set my camera at ISO 800. This allowed a fast enough shutter to minimize motion blur and also to stop down a bit for just a little more depth of field than shooting wide open at f5/6. If you come to Rocky Mountain National Park, be sure to check out Sheep Lakes on the eastern side of Horseshoe Park. More Colorado photos from this summer and fall are here. Posts about some of these photos are farther down the page in this blog. Canon 20D. Canon EF 100-400 IS lens at 400mm. Aperture: f/7.1. Shutter 1/160.
PHOTO OF THE DAY: MARSHALL PASS, COLORADO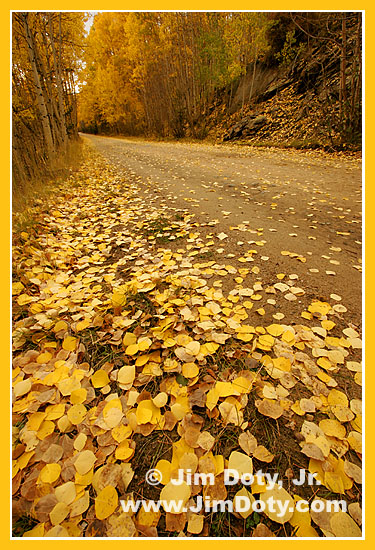 Aspen Leaves, Marshall Pass, Colorado. Photo copyright (c) Jim Doty,Jr. Aspen Leaves, Marshall Pass, Colorado. Photo copyright (c) Jim Doty,Jr.
It was a beautiful fall day on Marshall Pass, in southern Colorado. Aspen leaves were beginning to blanket the road. To emphasize the fallen leaves, the camera and lens were placed low to the ground. A 10mm focal length was used to give a very wide angle of view (equivalent to 16mm on a 35mm film camera) . The aperture was f/22 to maximize depth of field. Canon 20D, Canon EF-S 10-22mm lens at 1omm. Aperture: f/22. Shutter: 1/8 second.
Monday, October 03, 2005
PHOTO OF THE DAY: WET MOUNTAIN VALLEY, COLORADO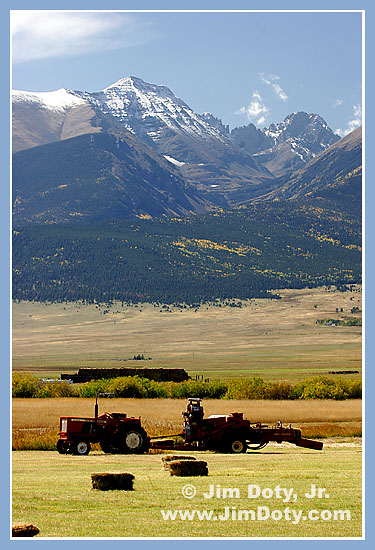 Wet Mountain Valley, Marble Mountain, Crestone Needle, Crestone Peak. Wet Mountain Valley, Marble Mountain, Crestone Needle, Crestone Peak.
Photo copyright (c) Jim Doty, Jr.The Wet Mountain Valley in southern Colorado is sandwiched between the Wet Mountains on the east and the Sangre de Cristo ("Blood of Christ") Mountains to the west. It is a beautiful place to take pictures. The whole Sangre de Cristo range rises dramatically from the valley floor and is quite spectacular, especially when snow covered. Pictured above is a small slice of the range. Canon 20D camera. Canon EF 28-135mm IS lens at 105mm. Aperture: f/11. Shutter: 1/30.
BEAR BASIN RANCH, SOUTHERN COLORADO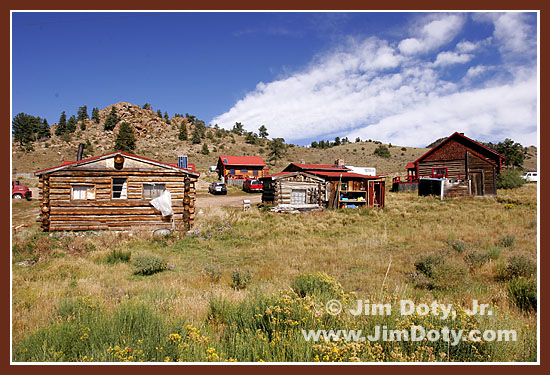 Bear Basin Ranch, Westcliffe, Colorado. Photo copyright (c) Jim Doty, Jr. Bear Basin Ranch, Westcliffe, Colorado. Photo copyright (c) Jim Doty, Jr.Last Friday, I was in southern Colorado taking pictures with Bob Walker, my brother-in-law and photo buddy. After taking pictures in the Wet Mountain Valley and the Sangre de Cristo mountains, we headed to Westcliffe for lunch. Westcliffe is a small, delightful, mountain valley town with a population that is around 460 and growing. 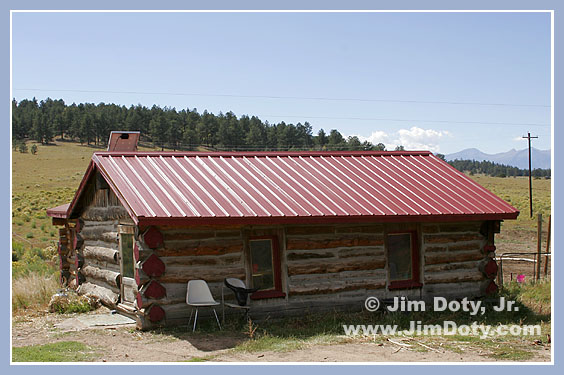 Cabin, Bear Basin Ranch, Westcliffe, Colorado. Photo copyright (c) Jim Doty, Jr. Cabin, Bear Basin Ranch, Westcliffe, Colorado. Photo copyright (c) Jim Doty, Jr.We stopped a cowboy on Main Street (one look and you knew he was the real deal) and asked him about a good place to eat. (We learned later his name is Ryan.) He sent us to Poag Malone's and said their ruben sandwich was good. He was right - the food was great. If you are in Westcliffe, it is a good place to eat. Coincidentally, Dory who waited on us at Poag Malone's, is Ryan's girlfriend. She asked what we were doing in Westcliffe. When we told her we were taking pictures, she invited us to visit the Bear Basin Ranch 11 miles east of town and take some pictures. 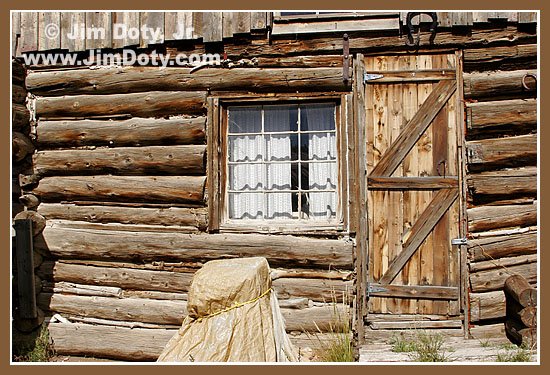 Bear Basin Ranch, Westcliffe, Colorado. Photo copyright (c) Jim Doty, Jr. Bear Basin Ranch, Westcliffe, Colorado. Photo copyright (c) Jim Doty, Jr.After taking some pictures south of town, we headed out to the ranch. We are glad we did. This is a real and rustic ranch, complete with a pair of "little houses out back" which are shared by everyone living and working on the ranch. In an interesting combination of the new mixed in with the old, electricity at the ranch is provided by solar collectors on some of the roofs. The ranch is located in the rolling hills at the eastern edge of the Wet Mountain Valley, with a view of the Sange de Cristo Mountains to the west. By the time we arrived, Ryan was back at the ranch. He is the manager of the horse ranch part of the operation. We also met Dave, Michelle, Bob, and Phyllis who are responsible for all the events that go on at the ranch. We spent some time learning about the packtrips, hunting, photography, and other events sponsored by the the ranch. Then we wandered around and took some photos. 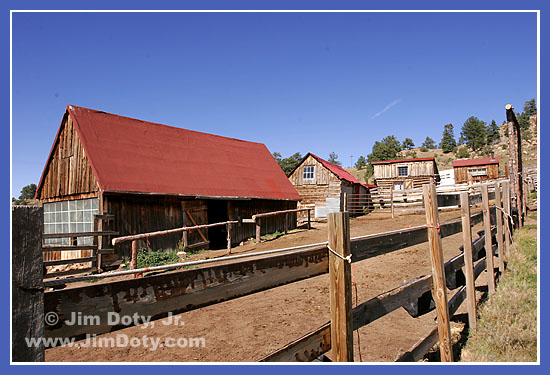 Bear Basin Ranch, Westcliffe, Colorado. Photo copyright (c) Jim Doty, Jr. Bear Basin Ranch, Westcliffe, Colorado. Photo copyright (c) Jim Doty, Jr.We were invited into one couple's home, a 300 square foot, one room cabin. Our host pointed out the office in one corner, the bedroom in another, and the kitchen and living room on the other side of the room. All the comforts of home in one room. The photo below was taken from the kitchen/living room, looking toward the office (left) and bedroom (right). You can see the loft over the office and bedroom. We enjoyed the wonderful hospitality that was extended to us. We were invited to take pictures inside the cabin. I took a couple of still shots and I did one panorama that I will stitch together when I get to my computer at home. If you think about it a bit, it is pretty remarkable for someone to invite two strangers into their home and invite them to take pictures. It reminded me of a simpler and more trusting time. 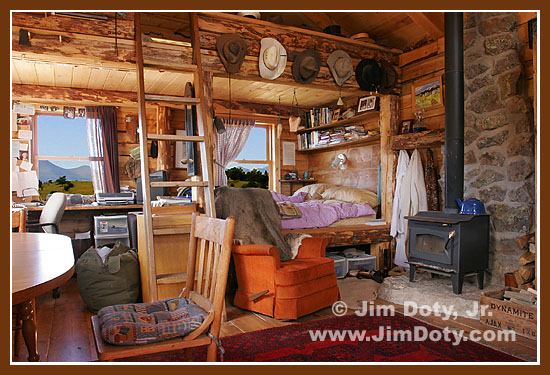 Cabin, Bear Basin Ranch, Westcliffe, Colorado. Photo copyright (c) Jim Doty, Jr. Cabin, Bear Basin Ranch, Westcliffe, Colorado. Photo copyright (c) Jim Doty, Jr.After our enjoyable visit, it was time to head down the road. We were grateful that a chance meeting in Westcliife led to an invitation to visit a working horse ranch. I'm sorry I have no horse photos, the horses were all elsewhere on the 5,000 acre ranch at the time of our visit. I would love to go back for one of the roundups. You can learn more about the packtrips at Bear Basin by going here and learn about the new photography shoot outs here. They also have rock climbing, horseback riding, whitewater rafting, hiking, and camping for singles, couples, families, and groups. Bob and I send our thanks to all the friendly folks at Bear Basin for all of the hospitality extended to us. My apologies if I didn't get someone's name right. You can learn more about Westcliffe, Colorado here, here, here, and here. 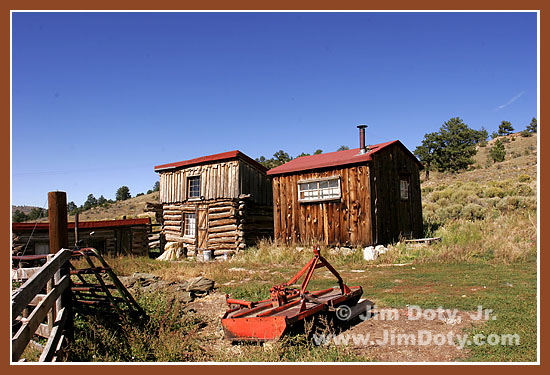 Bear Basin Ranch, Westcliffe, Colorado. Photo copyright (c) Jim Doty, Jr. Bear Basin Ranch, Westcliffe, Colorado. Photo copyright (c) Jim Doty, Jr.
|
|