Wednesday, December 28, 2005
GREAT COMPUTER MOUSEShort List:Logitech MX1000 Laser Cordless Mouse  Christmas came early when I was given a Logitech MX1000 mouse. Installation was simple, plug in the power cord and plug the small base station/charger into the computer and charge the mouse. Windows XP found and installed the mouse automatically. Install the software to customize the buttons and controls. I've gone through several mice while editing photos using various versions of Photoshop and Photoshop Elements. This mouse is terrific. It is fast and responsive with more precise control than any mouse I've used before. The laser technology provides a high degree of accuracy. No wonder it is so highly rated. Logitech info is here and there are great reviews all over the internet. Save money, support this site, and buy yours here:
Sunday, December 25, 2005
SEASON'S GREETINGS!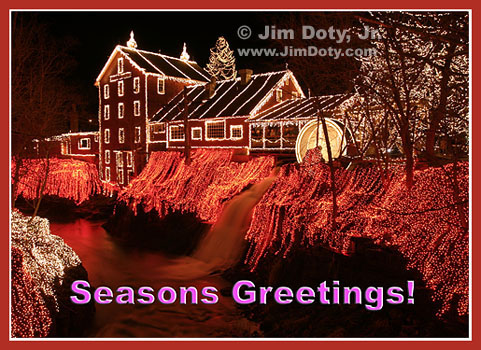 Merry Christmas to each one of you! Merry Christmas to each one of you! May the coming year bring us closer to "Peace on Earth" (Luke 2:8-14) for all of God's children in every place and of every race.
Thursday, December 22, 2005
MY NATURE CALENDAR IS AVAILABLE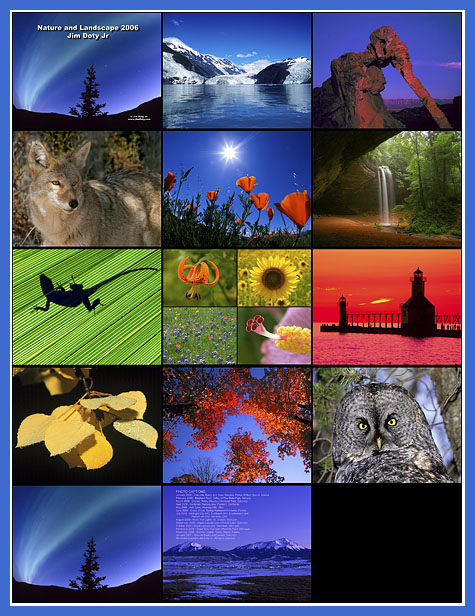 2006 Nature Calendar Preview 2006 Nature Calendar PreviewYou can order the calendar (and see a larger preview) by going to Lulu.com/Jim Doty. If you've been following my posts about Lulu.com, you know about my experiment with file types and their printer. If not, you can read more here and here. The short story is that I sent a test calendar to Lulu with photos of my grandchildren as three different file types. When the test calendar came back last Saturday, I knew what kind of file to send to Lulu to get the best results. I uploaded the photos for my nature calendar Saturday evening. The calendar shipped from Lulu on Tuesday and arrived here today. That is pretty good service. The calendar looks good. I am pleased with the overall results. For those of you who have been asking me to do a nature calendar, it is now available. The preview above shows the cover and the monthly photos. You can order the calendar (and see a larger preview) by going to Lulu.com/Jim Doty. If you want to do a calendar of your own photos but have someone else print it, I recommend Lulu. Be sure and send them properly edited sRGB files (see the above linked posts).
Wednesday, December 21, 2005
PHOTO OF THE DAY: SANTA'S HELPERS Santa's Helpers at Changes. Photo (c) Jim Doty, Jr. Santa's Helpers at Changes. Photo (c) Jim Doty, Jr.I go to Changes to get my hair cut, not to take pictures. When I arrived today, several of the staff were dressed up like Santa's Helpers. They wanted a picture of themselves but none of them thought to bring a camera. They asked me if I had a camera with me ( I usually do), so I took a few quick photos.
Monday, December 19, 2005
BEST TRIPOD HEAD QUICK RELEASE SYSTEMShort ListArca-Swiss The Arca-Swiss quick release system is the best and most universal quick release system. The system is simple and you can start for less than $80 and use almost any tripod head you now own. The Arca-Swiss system has a clamp on the tripod head and a mounting plate on the bottom of your camera or lens. The jaws of the clamp grab two long ridges on the side of the mounting plate. It is quick and secure. Arca-Swiss, Graf, Foba, Acratech, Markin, Kirk Enterprises, and Really Right Stuff all make some tripods heads that use an Arca-Swiss style clamp. Some of the heads by Linhof, Giotto, and Bogen-Manfrotto can easily be modified to take an Arca-Swiss style clamp. And finally, an Arca-Swiss clamp can be screwed on the top of almost any tripods head that has a 1/4 x 20 thread mounting stud for the camera. I addition to the clamp, you need a mounting plate to go on the bottom of your camera and any long lenses that mount directly on the tripod. The cheapest way to get started is to buy a $40 QRC-1 Quick Release Clamp and a $39 PZ-3 universal mounting plate (sorry, there is no photo of the PZ-3 on the Kirk site) from Kirk Enterprises. Screw the QRC-1 firmly on top of your existing tripod head and the PZ-3 on the bottom of your camera or long lens and your quick relese system is ready to use. Just drop the mounting plate between the jaws, tighten the jaws, and you are ready to shoot. For $55 or $60, you can get the QRC-1.75 or QRC-2 and have a little wider clamp. I think it is worth the money to get the QRC-2 clamp. For your information the QRC-3 and QRC-4 are drilled for a 3/8 inch mounting stud and are too large to mount on most tripod heads. A step up from a universal mounting plate is to get a plate that is machined specifically for your camera. These plates have a lip so your camera won't rotate when you flip your camera over to the vertical postion. You can order these custom made plates from Kirk Enterprises and Really Right Stuff. Unless the initial cost is a serious consideration, I recommend getting a custom mounting plate that is machined for you camera body. A universal plate will hold an SLR body and a small lens in the vertical position provided the plate is screwed on tight, but the custom plates are more elegant and will handle the larger lenses. For a step up from the custom mounting plates, get a custom made L-plate/L-bracket (I will use the word plate for both). These L-plates wrap around the bottom and left side of the camera, add minimal size and weight, and allow you to go from horizontal to vertical without flopping over the tripod head. The two best sources for L-plates are Really Right Stuff and Kirk Enterprises. The L-plates are designed so you can change batteries, connect a cable release, or access other camera connections without removing the bracket/plate. What if you have two cameras? If they are the same model, you can move the mounting plate back and forth. It takes me less than 60 seconds to take the bracket off of one one camera and mount it on another camera. I switch back and forth too often to want to do that, so I just got two plates. If you have two different camera models and one is a less used backup, put a universal plate on the backup and get a custom plate for your primary camera. If you use both cameras a lot, you will need two plates. If you have long lenses that mount directly on the tripod, you will need either a universal or custom plate to go on your long lenses. Again, the best source is Kirk Enterprises or Really Right Stuff. I have custom plates on my long lenses and a universal plate on my Canon 1x-5x macro lens. Some day you will want a ball head that has the Arca-Swiss style clamp built in. My current ball head of choice is the Kirk BH-3. I highly recommend it. I picked it because it is the most reasonably priced, highly-rated ball head that will suit my purposes. I've used mine for months and it is a high-quality, modest-sized, relatively light weight ball head that easily handles an SLR/DSLR with a 70-200mm f/2.8 or 100-400mm zoom lens. For a larger lens, you will need a bigger ball head. I haven't used any of the ball heads from Really Right Stuff but they are sending me a set to test in January. Do I have a preference for either company? Mostly no. I've been to Kirk Enterprises in Angola, IN and visited with the owner of Really Right Stuff by phone. Both companies are really good to work with. I own products from both companies and they are very good. My sole preference is when it comes to L-plates. The Kirk Enterprises L-plate grips the strap ring on the Canon 20D for added stability. This photo shows an extra attachment that goes on the L-plate for the camera strap. Since I occasionally remove the L-plate, I want the camera strap attached to the camera, not to the L-plate. For this reason, I prefer the Really Right Stuff L-plate for the Canon 20D and 5D. For everything else I have no strong preferences between the two brands. You can't go wrong with either company.
Saturday, December 17, 2005
BEST MEMORY CARDS FOR DIGITAL CAMERASShort List:SanDisk Lexar There are other good brands but these two are very popular with working pros due to their high reliability. Be sure you get the right kind of card for your camera (CompactFlash, Smart Media, etc.).
Thursday, December 15, 2005
BEST DIGITAL PHOTO STORAGEDon't lose your digital photos to disc rot or a hard drive crash. Choose the best archival options. Short CD List:MAM-A Gold Archive Delkin eFilm Archival Gold MAM-A Silver Archive Verbatim DataLifePlus (with Super AZO dyes) Taiyo Yuden Short DVD List:MAM-A Gold Archive MAM-A Silver Archive Short List of External Hard Drives:Maxtor Seagate It is a terrible feeling to go looking for that prized photo you took three years ago, only to discover the data on the CD-R is gone. The same can be said for a hard drive crash and the resulting loss of unretrievable files. I've heard too many sad stories from both friends and strangers that have lost important photos. A couple of days ago I received yet another frantic "What happened to my photos . . . " email. If you want your photos to be around 5, 10, 20 or more years from now, you need to back up your photos on the best drives and media. The best current approach to archiving your photos is to use both external hard drives and removable optical media (CD-R and DVD discs). After reading a number of web sites and wading through dozens of pages of government optical media tests and recommendations, here are my suggestions. Maxtor and Seagate make some of the most reliable external hard drives. Any hard drive can fail, even from one of the more reliable manufacturers, so the best plan is to have two external drives. Archive your best photos to one external drive and have the second external drive mirror the first. Maxtor one touch drives have software that make mirroring a simple process. (While you are at it, think about having another external drive that mirrors your internal hard drives.) Burn your photos to two archival CD-R or DVD discs. Store one disc on site and the other disc at another location. In the event of a local disaster (think Hurricane Katrina), you will have a set of your photos in another location. I've listed the best CD and DVD discs in order of quality, starting with the best. MAM-A Gold discs are the best for both CDs and DVDs. Delkin eFilm Gold is equal or close in quality. MAM-A Silver comes in second. MAM-A discs are made in the U.S. You can learn more about MAM-A here. Verbatim DataLifePlus comes in third. Read the labels carefully and make sure you are getting the discs with the Super AZO dyes. Taiyo Yuden is the only company making CD-R discs in Japan. They are higher in quality and much higher in consistency than the discs that are made in Taiwan, Mexico, and other countries. Taiyo Yuden makes discs for Maxell, Sony, Imation, and other companies, but not all of the discs sold by these companies come from Taiyo Yuden. Just read the label. If it says "Made in Japan", it was made by Taiyo Yuden. I just bought some "Maxell CD-R pro" discs that are "Made in Japan." For short term use, transferring files, and sending photos to publishers, I use less expensive Maxell, Memorex, and other discs. For long term storage I use archival discs plus external hard drives. A slightly different version of this article appears here, and an article on the use and care of CD-R discs is here. You can save some money (and support my web sites) by getting your MAM-A and Delkin discs and Maxtor external hard drives from Amazon.com by clicking the links below. (I stopped at two major computer discount chains today and their prices were $20 higher than the Amazon price for the 200GB Maxtor drive and $40 higher for the 300GB drive.) MAM-A Gold CD-R and DVD-R discs, Delkin eFilm Gold CD-R discs Taiyo Yuden 100-Pack Silver CD-R & 50-Pack Silver DVD-R 4.7GB Maxtor One Touch II USB 2.0 External Hard Drives, Seagate USB 2.0 and FireWire Drive
Saturday, December 10, 2005
YOUR OWN CALENDAR AT LULU - PART 2If you haven't read the first part of this article, scroll down to the December 3 post. The test calendar I put together and ordered last Saturday arrived in the mail today. In a word, the calendar looks really good! I also think a 7 day turn around time is pretty good. In comparison to high quality calendars, like those produced by Browntrout, and lesser quality color calendars, I would say the Lulu calendar isn't quite as good as the Browntrout calendars, but much better than some of the lesser quality calendars. I suspect the people who complain about the quality of Lulu's calendars probably aren't sending good quality files. It is important that you send them a quality jpeg file. Your monitor needs to have reasonably accurate color. If not, red on your monitor might end up being orange or purple on a print from some commercial printer. If the color on your monitor is off, faces in print could come back looking pretty strange. The colors on the Lulu calendar are close to what I see on my monitor. I sent three file types to Lulu. The sRGB files looked best in the calendar. When I do "real" calendars in the future (as opposed to my test calendar), I will know what to do to give them the best file. I will work in Adobe RGB as I always do. I will save my optimized photo in layers as a PSD file, just as I would for making a print at home. Then I will flatten the layers and convert the file from Adobe RGB to sRGB. I will resize the photo to 11.25 x 8.75 inches at 300 ppi, sharpen to taste, and save the file as a jpeg file (quality level of 10) with a different name. This is the version I will send to Lulu. Now that I have a calendar in mind hands, I can highly recommend Lulu as a good way to make your own calendars.
Friday, December 09, 2005
IMAGE EDITING SOFTWARE RECOMMENDATIONSYour photos will look their best if you optimize them with some good image editing software. Short list: Photoshop Elements 3 Adobe Photoshop CS/CS2 For editing your photos, it is hard to beat Elements and Photoshop, both from Adobe. Photosohop Elements is one of the best of the mid-priced (about $100) image editing software programs. It is the "lite" version of Photoshop I use it regularly. Of the four versions, I recommend version 3. Elements will give the you basic features and tools of Photoshop. If you buy a $17 book, you can add more of the features of Photoshop. If you have version 1 or 2 it is well worth the upgrade to get version 3. I am not yet ready to recommend version 4. Adobe Photoshop is the most popular software among professionals. It is arguably the best software available. It can do amazing things. When I need the more advanced features that Elements doesn't have, I use Photoshop. The only kicker? The price tag. There is a discount available at the present time from the links on my photo website and below. Read more about Elements and Photoshop here. Photoshop Elements 3, Windows (left), Mac (right) Photoshop CS2 upgrade, Windows (left), Mac (right) Photoshop CS2 full version, Windows (left), Mac (right)
TRIPOD RECOMMENDATIONSNext to your camera and lens(es), a tripod is probably your most valuable photographic accessory. It makes all kinds of photography possible that can't be done with a handheld camera. Tripod short list: Manfrotto 3001/3021/3221GN3/3221WN Gitzo G1228 Mountaineer Tripod head short list: Manfrotto 3025/3028 3-way-heads Slik Proball 800 ball head Kirk BH-3 ball head (Arca-Swiss type quick release) These tripods are all steady. The Manfrotto 3001 as somewhat short (better for people who want a lighter tripod that is a little shorter), but the other two operate at a good height. They have no center bracing so the legs can be splayed out to get close to the ground. The legs also splay separately for uneven terrain. The Gitzo is made of carbon fiber so it is a lot shorter (and a lot more expensive). All of these tripods allow you to use the head of your choice, and change heads if necessary. There are other good tripods, many of the made by Manfrotto and Gitzo. Be sure and pick a tripod with the features you need. The 3-way heads control movements in all three directions (left-right, up-down, horizontal-vertical) with three separate knobs. They give you a lot of control for landscape, architecture, closeup, and similar knids of photography. A bell head controls everything with one knob so they are much better for wildlife and other kninds of photography where quick control in all three directions is important. For more information, read my recently revised article on Tripods and and Tripod Heads. What is a good place to buy a tripod? Your local camera store is one option. If you would like to help support this website, and save some money in the process, consider getting your camera at Amazon or Adorama. Just click on a link at the bottom of my home page and order your camera. Other good sources are in the "CAMERA STORES" section on the top right side of this page. The BH-3 tripod head is available only from Kirk Enterprises. Happy Shopping and Merry Christmas! *** *** *** Kirk Enterprises BH-3 Ball head (available only from the manufacturer) Manfrotto Tripods and Heads Slik Pro Ball 800 Head with Quick Release GITZO G1228 MK2 Mountaineer Reporter Tripod
Thursday, December 08, 2005
CAMERA RECOMMENDATIONSIt's that time of year. "What kind of camera, lens, software . . . . . do you recommend." The questions come all year long, the pace just picks up a lot this time of year. This is the first of a series of articles based on emails I have writen. Film and digital, P&S and SLR, my highly opinionated suggestions follow. The primary choices are film or digital, point-and-shoot or SLR. The choice is yours. Here are just a few thoughts to consider. Film or Digital?If you like film and want to stay with film, then do so. Don't worry about the folks that say "film is dead" or urge you to get on the digital bandwagon. If you are happy with film, stay with film. On the other hand if you like to work on the computer, you get some of your film images scanned to disc, and you want to edit and print your own photos, then maybe it's time to jump to digital. Some folks love to tinker around with photos on the computer. Others just want to get their prints back with minimum fuss. Film is quick to have processed and printed. Digital is time intensive if you edit and print your own photos. Digital gives you fast feedback - click and look. Film is delayed gratification. Film cameras cost less, film processing costs a lot over time. Digital cameras cost a lot more than film cameras and get replaced a lot more often. It is very economical to burn your digital photos to disc. In terms of total cost over time, one may not have a significant advantage over the other. Only you can decide if it is time to jump over the digital divide. Point and Shoot or SLR?If you want an all-in-one, do-it-all camera with no decisions to make, point and shoot may be the way to go. Of course many point and shoot cameras give you a lot more control than they used to. Most DSLRs have a simple mode so they can be used like a P&S. The big question is do you want thye flexibility of being able to change lenses? If you do, then you need an SLR or Digital SLR. SLRs and DSLRs are bigger, heavier, and usually more expensive than point and shoot cameras. Point and Shoot Film CamerasShort List: Canon Sure Shot 130m Contax T3 Minolta Zoom 110 Date Olympus Stylus Epic (the best, inexpensive non-zoom cameras) Olympus Stylus Epic Zoom 115 Pentax Espio 24 EW (widest zoom lens on a P&S) Samsung Evoca 90W Neo Yashica T4 Zoom To figure out what features you need in a P&S camera, read my article here. Part 2 is a bit dated but the cameras mentioned are still good cameras. Manual SLR Film CamerasShort List: Canon AE-1 Canon AE-1 Program Canon A1 Canon F-1N (New F-1) For a retro approach to film photography, these oldies but goodies will take good pictures. Be sure and get them from a reputable source, preferably with a warranty of some sort. I've used Canon film cameras for a long time. I know them and like them. There are other excellent cameras of course. I just haven't used them. If you want to go the all manual route, you can still find some AE-1 and AE-1 Program cameras out there. The Canon F-1N (sometimes called the New F-1) pro line camera is a great manual everything, professional grade camera. My AE-1 and F-1N cameras are now 15-20 years old and they still work fine. The Canon "FD" manual focus lens line is highly respected and you can get them for a song compared to the autofocus lenses. NOTE: FD lenses go on the older manual focus bodies like the A-series, T-series, and F-1's. The EF Canon lenses go on the autofocus and digital bodies. THE TWO SYSTEM ARE NOT INTERCHANGEABLE. So far as the other cameras brands are concerned, these cameras have good reputations but I haven't used them so I can't vouch for them myself: Nikon FM (shutter works without batteries) Nikon FE/FE2 Nikon FA Minolta Maxxum 7000/7000i Minolta Maxxum 9000 Olympus OM2n Pentax Super Program Pentax LX Nikon FA Autofocus SLR Film CamerasShort list: Canon EOS Rebel T2 Canon EOS Elan IIe Canon EOS Elan 7e/7ne Canon EOS-3 Minolta Maxxum 7/9 Nikon N80/F100 Pentax *ist/ZX-5n/MZ-s Sigma SA-9 For autofocus cameras, my short list includes the Elan IIe, and EOS-3 cameras. I own and use them, and they are great camera bodies. You can use the lenses in manual or autofocus modes. You can meter manually or use program, aperture priority, or shutter priority modes. What more could you want in a film camera? You can pick up a used Elan IIe for a very reasonable price. I've recommended them to friends who were ready to go from P&S film to SLR film and they all like this camera. I've purchased the Elan IIe for myself and to give away. It is a great little camera. I haven't used the Elan 7e in either version but I've read good reports. If getting a used camera makes you nervous, the Elan 7e/7ne is a good mid priced option. The EOS-3 is a step up from the Elan cameras. It is more rugged, faster, and better weather sealed. It has more autofocus sensors and focuses faster. My EOS-3 is my number one, autofocus film camera. I haven't used the Canon Rebel T2 or the other cameras on the list so I can't vouch for them personally. They are highly rated by the sources I trust. Digital Point and Shoot CamerasShort List (sensor size in megapixels, lens range): Sony Cyber-shot DSC-P200 (7 mp sensor, 3x zoom) Canon PowerShot A620 (7 mp, 4x) Canon PowerShot S80 (8 mp, 3.6x) Sony Cyber-shot DSC V3 (7 mp, 4x) Canon PowerShot G6 (7 mp, 4x) Canon PowerShot S2 IS (5mp, 12x) Sony Cyber-shot DSC H1 (5mp 12x) Panosonic Lumix DMC-FZ5 (5 mp, 12x) Sony Cyber-shot DSC R1 (10 mp CMOS sensor, 7x) These are all of the cameras that received a HIGHLY RECOMMENDED rating (the highest) from DP Review in the last 12 months. They are listed in order of approximate size. It is a good beginning list for picking a digital P&S. Don't buy any of these cameras without reading the full review at DP Review. You can expand on this list by deciding what kind of P&S you are interested in: compact, medium sized, or an almost full-sized camera with a long zoom lens that looks like a DSLR. Look at reviews of the kind of camera you are interested in at DP Review. Make a short list of the cameras of the type you want that have at least a RECOMMENDED or HIGHLY RECOMMENDED rating from DP Review. Take your short list to your local camera store and look at just those cameras. Don't let some salesperson talk you into looking at something that is not on your short list. Buy a camera you like from the short list. It will help if you read my article on choosing digital cameras. Digital SLR CamerasShort list: Canon 10D/20D/5D Fuji FinePix S3 Pro Konica Minolta Maxxum 7D Nikon D50/D200 Olympus E-1/Evolt Pentax *ist D/S DSLRs come in low, medium, and high priced ranges. I will mostly cover the first two. These are relative price ranges of course since a low price digital SLR can cost as much as a mid range film SLR. The good news is that most of the current crop of digital cameras will do a fine job. If you already have a set of lenses for a film SLR and are going to make the jump to digital, it makes sense to get a digital body that you can use your current lenses on. I will cover Canon cameras first. I've used the Canon D30, 10D, 20D, and 5D cameras and own all but the D30. The D30 was fine for its day, but technology has passed it by. If you can find a used D30 for $300, it could be a great camera for you provided you understand its two primary limitations: image size and digital noise at high ISOs. You can make excellent prints from the D30 up to 8x12 or 10x15 inches. With excellent technique and the right subject, you can make 12x18 inch prints. If that is big enough for you , the D30 will work. The D30 has higher digital noise levels at high ISO settings. If you work mostly around ISO 100 or 200, this won't matter to you. ISO 400 is still pretty good. At 800 and higher, noise is much more obvious. If you need low noise levels at high ISOs, then think twice before getting a D30. Or use Neat Image (there are free and paid versions) to remove the noise. Lastly, a good friend of mine just acquired a used D30 and loves it. Then 10D and 20D are both very fine cameras. The difference are spelled out in this article. If the particular advantages of the 20D are not important to the kind of photography you do, by all means save some money and get a new or used 10D (around $650 used, in fact I have one for sale). On the other hand, if you need the 20D advantages, then get the 20D (around $1300). One last thought on the 20D, there are a lot of rumors that a replacement will be announced in February. If you want a 20D, I think it is worth waiting to see if the replacement is significantly better. If it is, get the replacement. Iff not, the prices on the 20D will drop and you can get a 20D. The 5D has some advantages over the 20D, most notably a full frame sensor. The disadvantage is a big increase in price ($3300 vs $1300). My 20D vs 5D comparison article is here. That covers the camera I have used. What about the Digital Rebel XT? I haven't used it myself so I can't vouch for it personally. It has a good reputation. If cost is a consideration, consider getting the Rebel XT. EF vs EF-S LensesOne last important Canon digital camera point. Canon EF lenses fit on all of the Canon digital SLR cameras. EF-S lenses will fit on the 20D and Digital Rebel XT. They will NOT fit on the D30, 10D, or 5D. If you have an eye on one of the EF-S lenses, particularly the 10-22mm lens, then you should choose a camera that will let you use EF-S lenses. How about all of the other brands? They all make some fine digital cameras. Pick one that you can put your existing SLR lenses on. If you don't have any SLR lenses, then consider one of the Canon cameras above. If you have Nikon lenses, the D50 is a good low priced model. The D70 is a good mid range model but I think it is worth waiting for the D200 instead. Two magazines have published articles comparing DLSRs. Be sure and read my summary of these articles here. Where to Buy?What is a good place to buy a camera? Your local camera store is one option. If you would like to help support this website, consider getting your camera at Amazon or Adorama. Just click on a link at the bottom of my home page and order your camera. Other good sources are in the "CAMERA STORES" section on the top right side of this page. For used equipment, I recommend Adorama, B&H, and KEH which are listed under the above CAMERA STORES link. Happy Shopping and Merry Christmas!
Saturday, December 03, 2005
CREATING A CALENDAR AT LULU Drew in the Dragon Slide. Photo copyright (c) Jim Doty, Jr. Drew in the Dragon Slide. Photo copyright (c) Jim Doty, Jr.What to do with all of your digital photos! Have you thought about making your own calendar? My children are working on their annual Christmas calendar with photos of our grandchildren. In the past they have printed their own, using a template and adding family dates to the calendar. This year they are thinking about using Lulu to print the calendars since Lulu allows you to add your own unique events to the days on the calendar. They asked me to edit the photos to get them ready for Lulu's printer. I have read varying reports on the quality of calendars printed by Lulu, anywhere from "pretty disappointing" to "quite good." I think part of the problem is the quality of the files that people send to Lulu. I've seen my website on enough different monitors to know that the color accuracy of monitors ranges from excellent to awful. If people edit a photo on their own monitor, and the monitor's color balance or brightness is way off, the resulting photos they get back will be pretty disappointing. I happen to know my monitor is in good shape. The photos I send out to several service bureaus come back looking like the photos I see on my own monitor. I haven't sent photos to Lulu before. I've read a lot of advice, some of it conflicting, as to what kind of file to send to Lulu for the best results. Today I sent a calendar to Lulu as a test. I sent five photos (or photo pairs as one image file) in three different file types: Adobe RGB, sRGB, and U.S. Web Coated (SWOP) v2. I optimized each image as an Adobe RGB file first, the file type I use for doing my own archival printing. Then I converted each photo to an sRGB file and saved it again with a different file name. Lastly I turned on Proof Colors in the Photoshop menu (go to View > Proof Colors and make sure "Proof Colors" is checked). Then I went to View > Proof Setup > Custom. For a profile I chose Working CMYK - U.S. Web Coated (SWOP) v2. I checked: Use Black Point Compensation, Ink Black, and Paper White. I unchecked: Preserve Color Numbers. The color went flat and dark. I re-edited the photos to bring back the color, saturation, and contrast and saved them again with a different file name. I logged on to Lulu, created an account, and created a test calendar. I used each image three times, once as each different file type. When the calendar was complete, I ordered a copy for myself. When the calendar arrives in the mail, I will compare photos and see which file type gives me the best results on Lulu's printer. I will keep you posted as to which file type is best and if I like the overall results. You can see the test calendar here. The calendar is viewable by the public so my children can order a copy for themselves and see how the different file types came out. I will eventually make the calendar non-viewable by the public since it is purely experimental. Besides, who would want to order a calendar that has the same photo three months in a row. Now is your chance to preview it. Creating an account and a calendar at Lulu was quite easy. If you would like a way to create a calendar for your friends, Lulu is a simple way to go. It doesn't cost anything to create the calendar. You only pay for what you order and you can order as little as one copy. Prices are quite reasonable. It should take 7 to 10 days to get my calendar. I will report back then. If I like what I get, I will create a nature calendar for 2006. If I do, it will appear here.
Wednesday, November 30, 2005
REMARKABLE CHRISTMAS LIGHTSThis is the most remarkable Christmas light display by a home owner that I have ever seen. It is computer synchronized to the music and the most spectacular part is at the end. You will need a broadband connection and Windows Media Player. Go here or here or here. Merry Christmas!
MAGIC DIGITAL ERASER It would be nice to have a magic digital eraser to remove unwanted objects from photographs. Just click on the object and it is gone. It can be done, it just takes lots of clicks, some time, some skill, and the "digital eraser" tools that come with most image editing software. The photo above was edited entirely with Photoshop Elements 2, excellent software that you can get for less than $100. (I have the full version of Photoshop CS but didn't need it for this task.) I was asked if I could remove the hands and arms from this photo. The task was more challenging than the usual digital removal request, but I decided to give it a go. Simple removals, like taking a power line out of blue sky, are easy. Just use the CLONE STAMP tool, click to select some blue sky pixels next to the power line, then click again to drop the blue sky pixels right on power line. Voila! That part of the power line disappears. Simple. Repeat up and down the power line until it is gone. The same is true for removing a small skin blemish from a face. Click on some clear skin nearby, then click on the blemish and it is gone. The challenge with this photo was the need to create whole new areas from scratch, or so it seems. Part of the hands and arms were easy to remove. Grab some orange from the tiger costume, some burgundy from the caballero costume, or some of the dark shades from the background, and clone them right over the adjacent hands and arms. In other areas, using the CLONE STAMP tool was more like free hand drawing. Grab an orange and black edge and drag it over the hand, extending the existing line. This works well if you don't have to drag too far. If you make a mistake, simply undo the last step, or back up a few steps in the history palette and try it again. It takes a steady hand and a bit of an artistic touch. The more you do this, the better you get. The trickiest part of this photo was creating the missing one and a half fingers on the right hand. Use the CLONE STAMP tool and drop or draw pixels from the fully visible fingers. For larger sections, instead of using the CLONE STAMP tool, it is easier just to grab a "selection" from somewhere else in the photo. The missing part of the right shoulder was taken from the left shoulder. This is easier than the description of it sounds. Using the LASSO tool, draw a SELECTION around the area to be borrowed from the left shoulder. From the menu go to LAYER > NEW > LAYER VIA COPY. This turns the selection into a new layer. Pick the MOVE tool. Hold down the ALT key, left click, and drag the left shoulder layer over to the right shoulder area. The shoulder is backwards so you will need to flip it. From the menu choose IMAGE > ROTATE > FLIP SELECTION HORIZONTAL. To make minor changes, go to the menu and pick IMAGE > TRANSFORM > FREE TRANSFORM to resize or make slight changes in the rotation of the layer so it fits the new location. Change the OPACITY of the layer to see what is underneath it. Once your layer (shoulder) is in place, change the OPACITY back to 100%. Use LEVELS (under ENHANCE > ADJUST BRIGHTNESS AND CONTRAST) to match the layer brightness as closely as possible to the new location. Then go to LAYER > FLATTEN IMAGE. Use the CLONE STAMP tool to do any necessary blending and matching of colors where the new selection was dropped in place. The same technique took the left sleeve to create the right sleeve. The area under the right sleeve (next to the yellow cloth) came from the area under the left arm. Using selections and layers to take one area of a photo and use in another is a lot easier than trying to create the area free hand. This works for small touches too. The star on the caballero costume was selected, turned into a new layer, distorted in shape (IMAGE > TRANSFORM > SKEW) and moved to two other places of newly created costume. There really is a magic digital eraser. The tools in the image editing software provide the eraser. You provide the magic! Support this site. Buy your image editing software from the links at the bottom of this page. Or use the Amazon link at the bottom of the pages of my photo website and search for the software of your choice. Thanks.
Saturday, November 26, 2005
PHOTO OF THE DAY: CLIFTON MILL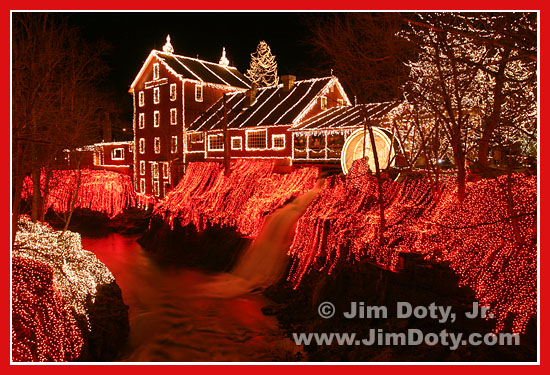 Clifton Mill Ohio. Photo copyright (c) Jim Doty, Jr. Clifton Mill Ohio. Photo copyright (c) Jim Doty, Jr.Clifton Mill, built in 1802, is one of the largest powered grist mills still in existence. Of several mills that were built along the Little Miami River near the Village of Clifton, Clifton Mill is the only one still in existence. Clifton is in the Dayton area and just east of Yellow Springs. From late November through January 1 there is a nightly lighting display from 6 PM to 9:30 PM. More information is here. You can eat at the mill, shop at the store, and watch 3 million lights go on. Go early so you can park near the entrance. More mill infomation is here. Both sides of the river bank are covered with lights. You can see one of two waterfalls to the left of the lighted mill wheel (the other is not visible in this photo). This photo was taken from a window on the covered briidge. The camera was tripod mounted to allow a long shutter speed. If you want to make it a day, check out the art galleries and shops in Yellow Springs, then head east to Clifton for the light show. Some of the shops in Yellow Springs have a distinctive kind of "60's hippie" feel. Canon 10D, ISO 100, daylight white balance. Canon EF 17-40mm lens at 17mm. Aperture: f/8, Shutter: 8 seconds.
DVD RECORDERSDVDs are replacing videotapes. DVD Recorders are replacing VCRs which will probably go the way of the 8-track. Some DVD Recorders will record TV shows to a hard drive and allow you to edit out the commercials before you record to a DVD. You can slo record your videotapes to DVD with a DVD Recorder. If you are worried about your treasured videotapes wearing out or deteriorating over time, now is the time to convert them to DVDs. Prices are going down and quality is going up. So how do you pick a good unit? A list of good review sites is here. The same site also has its own reviews.
Monday, November 21, 2005
PHOTO MECHANIC BETAPhoto Mechanic is an excellent image viewer and editor for Windows PCs and Macs. You can download the current beta (version 4.4) here.
Friday, November 18, 2005
PHOTO OF THE DAY - ASIAN FESTIVAL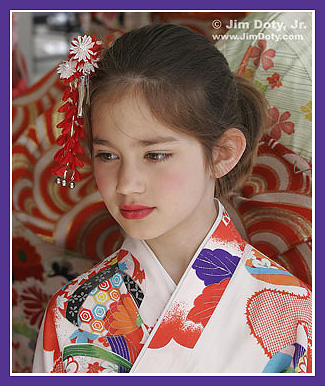 Asian Festival - Columbus, Ohio. Photo copyright (c) Jim Doty, Jr. Asian Festival - Columbus, Ohio. Photo copyright (c) Jim Doty, Jr.
CANON 5D REVIEW
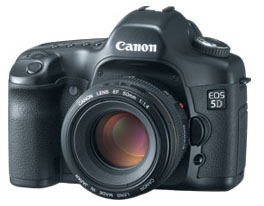 Canon EOS 5D Canon EOS 5DIn August, I did a "First Look" comparison of the Canon 20D and the new Canon 5D. A few days ago, Phil Askey at DP Review published a detailed review of the Canon 5D and gave it a HIGHLY RECOMMENDED rating, his highest. I am happy to report that this review confirms the observations I made in my article last August. In the review, Phil Askey says "The EOS 5D is a fantastic photographic tool which is capable of producing really excellent results. The caveat is that it takes a little more care and understanding of your equipment (especially lenses). We found resolution to be absolutely excellent with crisp detailed results straight from the camera (JPEG) and even more detail available if you shoot RAW." Phil knows his stuff. DP Review is one of the most widely read and highly respected digital camera review sites on the internet. It has been recommended in several photo magazines. What is so special about the Canon 5D? It is one of only two cameras now being manufactured that have a full-frame (35mm size) digital sensor. The other camera, the Canon 1Ds Mk II, sells for well over $7,000. The Canon 5D is currently selling for $3299. The Canon 5D has a 12.8 megapixel sensor which equates to big enlargements. The large photosites (pixels) mean low noise at high ISOs. So who is buying this camera? A lot of professionals that use the Canon 1Ds Mk II are now using the Canon 5D as a backup body or when they want to carry a much smaller and much lighter weight camera body. A lot of serious amateurs (and a number or professionals) are upgrading from the 20D to the 5D, which is the primary reason I wrote my article last August. The advantages of a large, full frame sensor in a relatively compact body make the price worth it for those who can afford it. If past history is any indication, the price should drop below $3,000 sometime in the next few months. Is the Canon 5D for you? Read my article and the review at DP Review and then you decide. Order a Canon EOS 5D from Amazon or Adorama to get a great price and pay no taxes (unless you live in a state that collects taxes for internet purtchases). Amazon will also give you free shipping. If you order using one of these links, it will help support my websites and won't cost you a penny more. Thanks.
Thursday, November 17, 2005
CANON LENS RECALL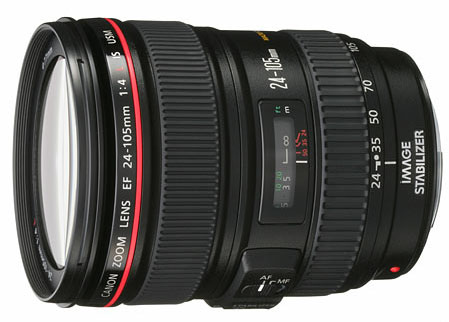 Canon EF 24-105mm f/4L IS USM lens Canon EF 24-105mm f/4L IS USM lensThere is good news and bad news. The good news is that this is an excellent lens, perhaps the best Canon mount walk-around lens in this focal length range. My article on this lens is here . The bad news is that some early production samples of this lens may have a problem with excessive flare. Canon will repair these lenses at no charge. Affected lenses have a control number less than 1000. Look on the rear lens mount for the letters UT followed by a four digit number. If it is less than 1000, your lens may need to be fixed. Some early lenses have the problem with flare and some do not. An example of the problem is here. Canon is no longer shipping this lens and has recalled all dealer stock. When this lens is available again, the problem should be corrected. This is why I usually recommend waiting a few months after a new product is introduced before buying it. This allows the manufacturers some time to work out the bugs. Do I follow my own advice? Usually but not always. This is still a great lens and I intend to acquire one when they are back on the market and the flare problem is solved. You can pre-order the CANON EF 24-105 f/4L IS USM LENS from Amazon or Adorama.
Saturday, October 29, 2005
PHOTO OF THE DAY: THE PATH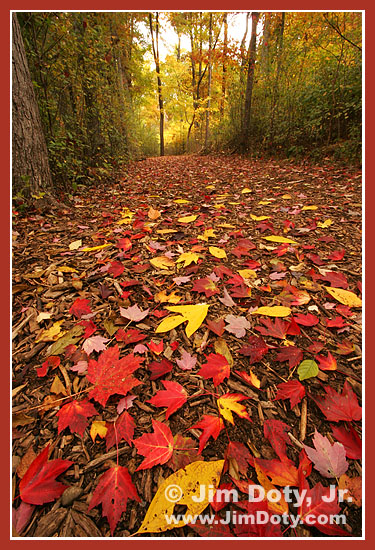 The Path, West Lake Nature Preserve. Portage, Michigan. Photo copyright (c) Jim Doty, Jr. The Path, West Lake Nature Preserve. Portage, Michigan. Photo copyright (c) Jim Doty, Jr.Michigan has some of the most splendid fall color in the country. Maple trees turn orange, red, and crimson, and fill the hillsides with glorious color. My favorite places in Michigan to film fall color are in the U.P. (upper peninsula) and the northern part of the mitten (just draw a line from Traverse City to Alpena and drive anywhere within 50 miles north or south of the line). Farther south, the West Lake Nature Preserve (WLNP) is a little piece of wilderness right in the middle of Portage, Michigan (just south of Kalamazoo). There is something to film there almost any time of year. WLNP is one of my favorite places to take photos. Earlier this week I took the above photo on one of the WLNP walking trails. It was cloudy and the forest was filled with soft light. The trail was covered with recently fallen leaves. The camera is on a tripod and quite low to the ground. I used a wide angle lens and a small aperture to maximize depth of field. Canon 20D. Canon EF-S 10-22m lens at 10mm (equivalent to 16mm in 35mm film terms). Aperture: f/22, shutter: 1.6 seconds.
Saturday, October 22, 2005
PHOTO OF THE DAY: HOUSE FIRE House Fire. Columbus, Ohio. Photo copyright (c) Jim Doty, Jr. House Fire. Columbus, Ohio. Photo copyright (c) Jim Doty, Jr.It was cloudy and raining when I took this photo so I set my camera at ISO 400 to give me a small enough aperture for enough depth of field plus a shutter speed fast enough to keep from blurring the fire. The brightness of the flames can fool the camera meter so I set my camera on manual and did a "substitute gray card reading" off of the back of my hand and opened up one stop (my hand is one stop lighter than an 18% gray card). The camera, lens, and I got wet but the photo was worth it. Most modern cameras and lenses can survive a little rain. Of course you takes yours out in the rain at your own risk. As you can see, the house was a total loss.
Canon 20D digital camera. Canon EF 70-300mm DO IS lens at 300 mm with image stabilization turned on. Shutter: 1/125, Aperture: f/10.
Thursday, October 20, 2005
CANON 20D COLOR INFRARED PHOTOGRAPHY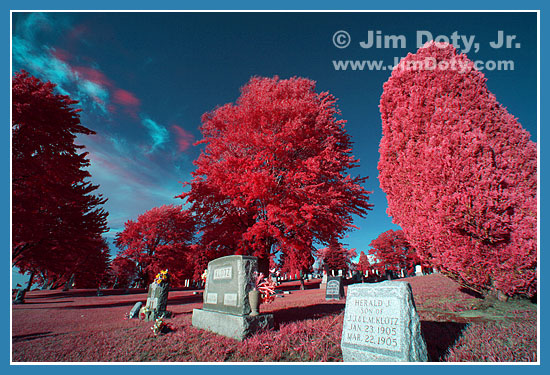 Canon 20D Color Digital Infrared. Photo copyright (c) Jim Doty, Jr. Canon 20D Color Digital Infrared. Photo copyright (c) Jim Doty, Jr.Color infrared photography with film and filters can yield some wonderful and oddly colored images, but the significant complications involved kept most photographers from delving into the infrared realm. Kodak Ektachrome EIR is great stuff but hard to work with. Fortunately, it is much easier to do color infrared photography with a digital camera. Now you can have the fun of doing color infrared photography without all the hassles. Despite a lot of internet reports to the contrary, it is possible to do both color and black and white infrared photography with the Canon 20D and 10D (and a number of other digital cameras). Black and white infrared photography is relatively simple. In addition to a camera and lens, all you need are a Hoya R72 filter, a tripod, and some basic (under $100) image editing software. Information on how to do this was the subject of a prior post (October 10, 2005) and is now an article on my website. To do color infrared photography the equipment is the same, but the imaging editing software must be able to handle RGB color channels and LAB mode. Adobe Photoshop will do this (along with several other kinds of software) but Photoshop Elements will not.  Original color image to be combined with a matching infrared image. Original color image to be combined with a matching infrared image.
Photo copyright (c) Jim Doty, Jr.Taking the photo is the same as for black and white infrared, except that two identically registered photos must be taken. Immediately before or after taking the infrared image with the Hoya R72 filter, a normal color photo should be taken. The camera should be on a tripod and the aperture for both photos needs to be the same. Except for the filtration, both photos should be identical. The two images will be combined later in the computer. 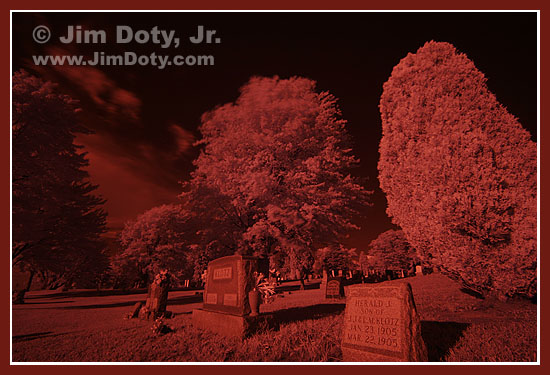 Original infrared image to be combined with a matching color image. Photo copyright (c) Jim Doty, Jr. Original infrared image to be combined with a matching color image. Photo copyright (c) Jim Doty, Jr.Open both images in Photoshop (or the image editing software of your choice). Begin with the normal color image. Select the entire image (CONTROL-A). Choose channels and click to select the green channel. Copy the green channnel (CONTROL-C). Select the blue channel and paste in the information from the green channnel (CONTROL-V). Select and copy the red channel (CONTROL-C). Select the green channel and paste in the red channel information (CONTROL-V). What you have accomplished is to move the red channel info to green and the green channel info to blue. Select (click on) the infrared image and select the entire image (CONTROL-A). Choose the red channnel and copy it (CONTROL-C). Go back to the normal color image and choose the red channel. Paste the infrared red channel into the color red channel (CONTROL-V). You now have a color image much like Kodak Ektachrome EIR with reddish-magenta vegetation and those unusual blue skys (top image of this post). Note that the movement between the color and infrared photos resulted in non-registered sets of aqua-blue and pink clouds. You can use LEVELS and HUE/SATURATION to tweak the final image. Experiment by moving the color channel information to different channels than the ones I suggested above. 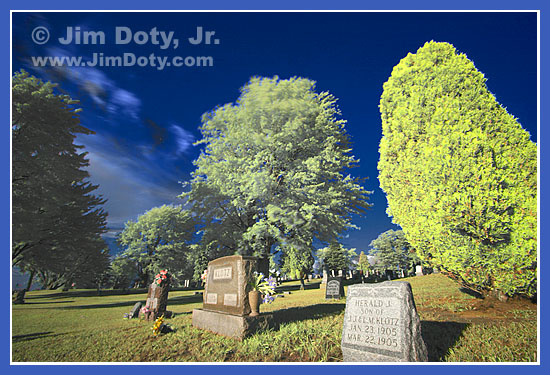 Digital infrared image from combined infrared and color images. Photo copyright (c) Jim Doty, Jr. Digital infrared image from combined infrared and color images. Photo copyright (c) Jim Doty, Jr.The digital infrared image immediately above was processed from the same color and infrared images, but in a diffeent way. Open both images in Photoshop. Convert the normal color image from RGB to LAB mode. Go to the infrared image, and select the whole image (CONTROL-A). Choose the red channel and copy it (CONTROL-C). Go back to the color image and choose the LIGHTNESS channel. Paste the infrared red channel into the color LIGHTNESS channel (CONTROL-V). Now convert the color image from LAB mode back to RGB and tweak with LEVELS and HUE/SATURATION. The result is another rendition of color infrared that is unusual but less over the top. 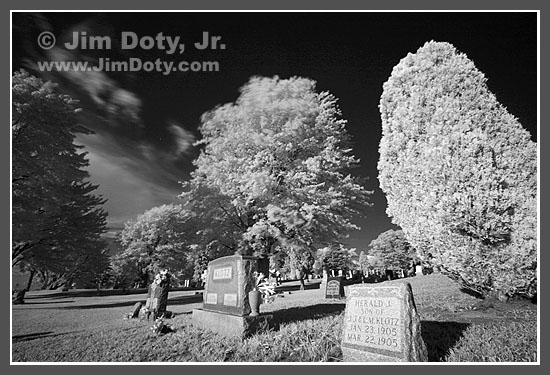 Black and white infrared image. Photo copyright (c) Jim Doty, Jr. Black and white infrared image. Photo copyright (c) Jim Doty, Jr.An infrared image right out of the camera looks red until it is processed into a black and white infrared image. This is what the original infrared image looks like as a black and white infrared image. 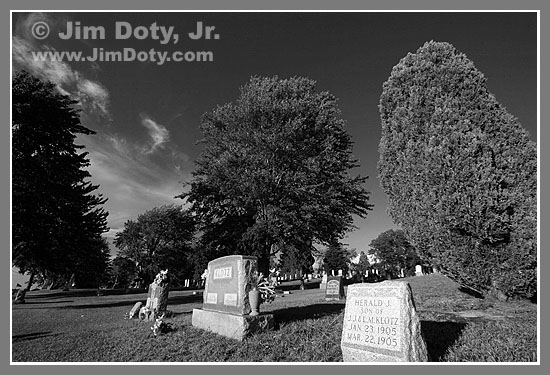 Color to normal black and white. Photo copyright (c) Jim Doty, Jr. Color to normal black and white. Photo copyright (c) Jim Doty, Jr.For the sake of comparison, the black and white image above was processed from the original color image. It is quite different from the infrared black and white image.
2nd LOOK: Canon EF 24-105mm f/4L lensCanon EF 24-105mm f/4L IS USM lensI first wrote about this lens when it was announced last August. Enough reviews have been posted to give this lens a second look. The news is very good. Read more at my article here.
Tuesday, October 18, 2005
FALL COLOR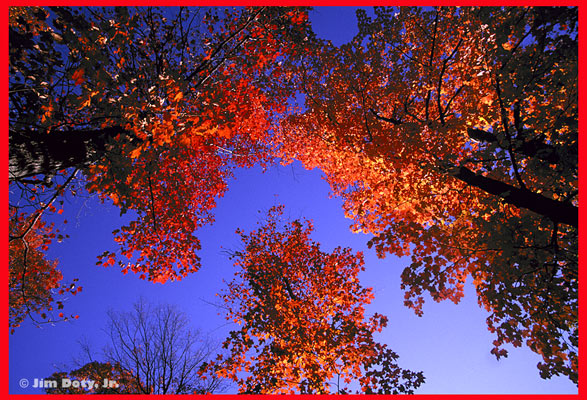 Fall Maples Leaves,l Michigan U.P. Photo copyright (c) Jim Doty, Jr. Fall Maples Leaves,l Michigan U.P. Photo copyright (c) Jim Doty, Jr.The fall color season is here. I caught some great color in Colorado a couple of weeks ago before the wind and snow stripped many of the trees at higher elevations. According to recent reports, there is still some excellent color in some locations in the San Juan mountains of southwest Colorado. There are also some great locations in the Eastern Sierra of California. The peak of fall color is working its way across Michigan's Upper Peninsula. Peak color is still one to two weeks away in much of the lower peninsula of Michigan. There is great color to be found in some places in New England. Over the next few weeks, color will continue to work its way south. You can track and find the color from fall color links at my website. Happy Shooting!
Friday, October 14, 2005
MEMORY CARD QUESTIONS Antelope, South Park, Colorado. Photo copyright (c) Jim Doty, Jr. Antelope, South Park, Colorado. Photo copyright (c) Jim Doty, Jr.Recently I was asked two questions about brands, reliability, and speed of memory cards for use in digital cameras. The Q&A follows. Q. I have been searching for places online that will give me some good info on what kind of memory card(s) to purchase if and when I take the plunge with a Canon Rebel XT, and I'd appreciate some help from you. I usually shoot at air shows, static and flying subjects, in the hopes that a few images can be culled to be enlarged to 8x10s.
When it comes to figuring out what kind of memory card to buy, I am on sensory overload. High speed? Flash cards? 512 mb, or 1 gig? I don't need infinite memory, but would like the option to exploit the XT's 3 fps feature as high-priced aircraft streak overhead. Any insights you can offer will be greatly appreciated.A. I use Lexar and SanDisk CF (CompactFlash) cards and I have had no problems with them. They are both well respected brands. I have had problems with other brands. The faster versions of these cards do work a little faster in some of the more recent cameras. I can't say if that would be true for the Digital Rebel XT. Personally, I don't think it is worth the money to buy the fastest cards out there. The size card you use (in terms of memory) is a matter of personal taste. It is a choice between how often you want to change cards, versus how many photos you are willing to risk. Bigger cards mean less card swapping. BUT, like all electronic devices, memory cards will eventually fail. The bigger the cards you use, the more photos you risk if a card fails and you can't retrieve the photos. I do check my LCD from time to time to make sure all is ok, but that is no guarantee. I took a few photos at the end of a personal shoot using an off brand microdrive. Everything looked ok on the LCD. The next day, the camera couldn't write to the microdrive and the prior day's photos (not too many fortunately) were not recoverable. I tend to use mostly 1-GB CF cards. For critical stuff, I use two cameras so if one card dies, I have similar photos on another card in the other camera. If you will burn your photos to a CD, the photos on one 512 MB CF card will burn nicely to one CD. If you will burn your photos to DVDs, you can burn the photos on four 1-GB cards (or two 2-GB cards) to one DVD. This may be of less importance than the other considerations mentioned above. Q. You mentioned in your previous answer to me that you used Lexar and Sandisk products. Well, now that I am focusing on this aspect of digital photography, I see myriad choices. While I understand the difference between 256mg and 1 gig, what confuses me is the difference between standard speed, 40X high speed and 80X high speed. Of course, the prices go up accordingly. But what exactly does the "speed" and the 40X and 80X mean when the subject is media cards? Thanks again for your help.A. 1x is usually defined as a write speed of 150 kB/s. Therefore, 20x, 40x and 80x cards should be able to record data at around 3 MB/s, 6 MB/s, and 12 MB/s respectively. The catch is that is the speed at which the CARD can receive and record data, not the rate at which any given CAMERA can send data to the card. A Digital Rebel or a Canon 10D don't write any faster to a fast card than a slow card due to the camera technology. A Canon 20D can write faster to a faster card, but not fast enough to make an 80x card worth the money, at least not for me and the way I take pictures. Since most cameras have a buffer, you can take pictures as fast as you want and the card speed doesn't matter so long as you don't fill the camera buffer. Once the buffer is full, the write speed of the camera to the card becomes important, as well as the speed the card can receive data. In real world use, I don't see much difference in using a 20x versus a 40x card in my Canon 20D, but that is because I rarely fill the buffer, even in fast sporting events. I rarely need to shoot 23 or more photos as fast as the camera will go. Will an 80x card have an advantage over a 40x card? Only if you fill your camera's buffer, and then the write speed of the camera is more of a factor than the speed of the card. So the advantage is less than the numbers would indicate. The same is true for 20x and 40x cards. I use both and the "real world" advantage of the faster cards is less than the "theoretical" advantage the numbers would indicate. I am happy with either.
Monday, October 10, 2005
O'HAVER LAKE IN INFRARED LIGHT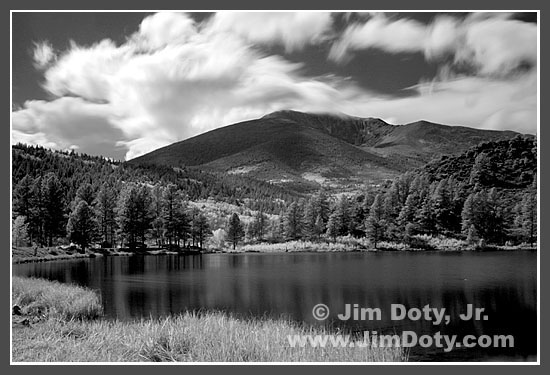
O'Haver Lake and Mt. Ouray (Colorado) in infrared light. Canon 20D digital camera with Hoya R72 filter. Photo copyright (c) Jim Doty, Jr.It is possible to capture infrared images with the Canon 20D, the Canon 10D, and a number of other digital cameras that aren't specifically designed for infrared photography. Although many of these cameras have an infrared cut-off filter to eliminate infrared light from reaching the sensor, with the right filter, enough infrared and/or near infrared light gets through to make this kind of photo possible. It works better with some digital cameras than others (and won't work at all with some). 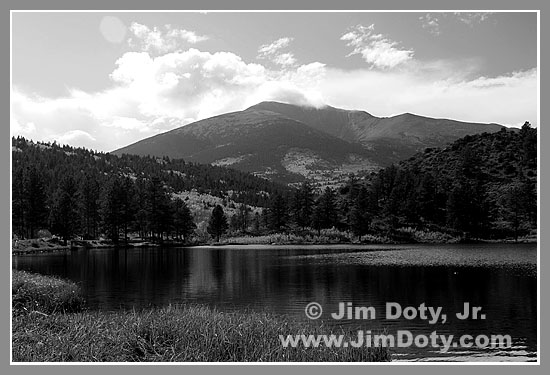
O'Haver Lake and Mt. Ouray (Colorado) in Black and White.
Photo copyright (c) Jim Doty, Jr.Infrared black and white photography has a different look than regular black and white photography. Compare the two images above. The second image is a straight forward black and white image which was converted from the color image at the end of this post. Subjects that emit infrared light are recorded as white or light tones and subjects that emit very little or none are recorded as black or dark tones. In infrared light, blue skys look very dark and vegetation records as light to very light tones. In straight black and white photography, blue skys and vegetation record as shades of gray unless some kind of filtration is used. To do infrared photography with a Canon 10D or Canon 20D camera (or one of the other digital cameras that can do this), use a Hoya R72 infrared filter. These are expensive (around $275 in a 77mm size). Set the camera on a tripod, compose, and focus before you put the filter on the lens. The filter is so dark that you won't be able to see through the viewfinder. Exposures are long. On a bright, sunny day, start with ISO 100, f/8 and 30 seconds and bracket exposures from 15 seconds to 1 minute. The resulting image will be red on the LCD viewing screen. Transfer the image to your computer, use Photoshop, Photoshop Elements, or some other image editing software to remove the red caste (desaturate the image). Then use "levels" to tweak the contrast. If you did everything right and picked a good subject, you now have a dramatic, black and white infrared image! Do a search on the internet to see if you can do digital infrared photography with your camera. If you can, digital black and white infrared photography is a lot less fuss and bother than infrared film. With infrared film, you had to take a lot of extra precautions which included opening the film canister, loading and unloading the camera, and putting the film back in the cannister, all in absolute darkness. Ah, the good ol' days. 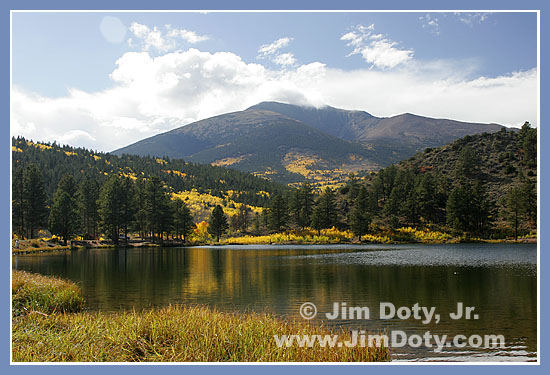
O'Haver Lake and Mt. Ouray (Colorado) in Color.
Photo copyright (c) Jim Doty, Jr.
Sunday, October 09, 2005
LONG'S PEAK REFLECTION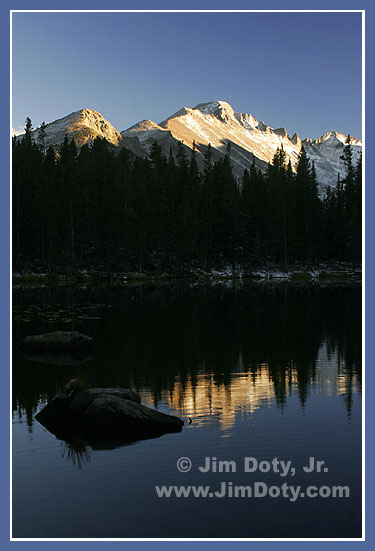 Long's Peak Reflected in Nymph Lake, Rocky Mountain National Park, colorado. Long's Peak Reflected in Nymph Lake, Rocky Mountain National Park, colorado.
Photo copyright (c) Jim Doty, Jr.It was late in the day and the last bit of sunlight was disappearing as shadows of other mountains crept up the side of Long's Peak. I tried several locations on the shore of Nymph Lake and chose one which would show the rippled reflection of Long's Peak along with a rock in the water to add a foreground center of interest at lower left to balance the mountain ridge at the upper right. Canon 20D. Canon EF 28-135mm lens at 28mm. Aperture: f/16, shutter: 1/5 second.
Saturday, October 08, 2005
THE FALL ELK RUT, RMNP, COLORADO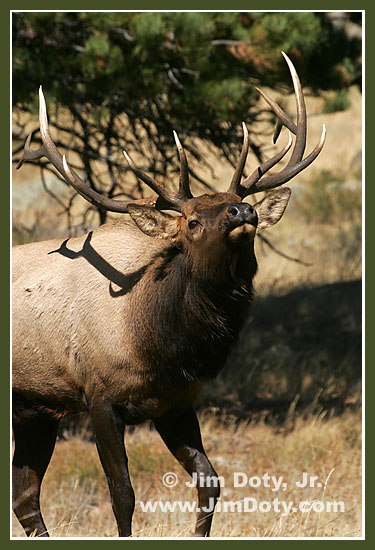 A bull elk struts his stuff, Rocky Mountain National Park, Colorado. A bull elk struts his stuff, Rocky Mountain National Park, Colorado.
Photo copyright (c) Jim Doty, Jr.If you go to Rocky Mountain National Park during the fall rut, you are almost guaranteed to see large herds of elk. The rut begins in early September and ends in mid-October. The last week or two of September through the first week in October is a good time to go to see both elk at their best and fall color. The elk are usually back in the trees during the day. In later afternoon to early evening, they come out into the meadows and the show begins. Large mature bucks have gathered their harems while younger bucks try to steal a cow or two. The big bucks run them off. Bugling is a delight to the crowds that gather to watch the spectacle. Visitors line the roads near the largest herds, sometimes clogging the roads in "elk jams". It's easy to find the elk, just head out in the evening and look for all the cars. The best places to look are in Moraine Park, Beaver Meadows, Horseshoe Park, and Hollowell Park. Refer to the park map, these locations aren't far apart and you can check out several in an evening. 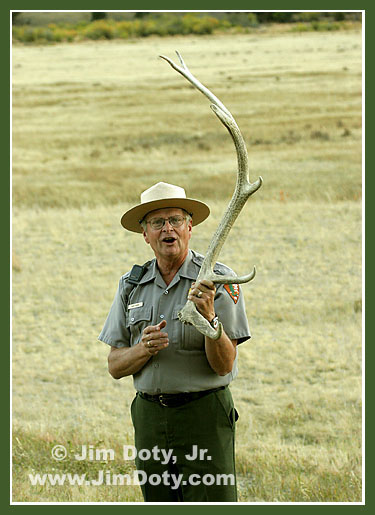 "Ranger Don" give his classic elk rut evening talk. Photo copyright (c) Jim Doty, Jr. "Ranger Don" give his classic elk rut evening talk. Photo copyright (c) Jim Doty, Jr.To learn about the elk rut, go to one of the evening ranger talks. Details are in the park newsletter that you receive when you drive in, or ask at one of the visitor's centers. I will give you just a fews of the highlights. It takes a lot of work to attract and hold a harem. First of all, elk need a big and impressive set of antlers. The antlers get bigger with each passing year. Older elk have the biggest racks. Elk need to smell good to the cows, so they douse themselves with "elk cologne." That is a euphemism for elk urine. A bull elk has the interesting ability to control the spray from a wide, fine mist, to a narrow focused stream. When you see a big bull with his belly heaving up and down, he is spraying a fine mist of urine all over his belly. Then he lowers his head between his front legs and hits himself in the head with a narrow stream. What a stench. You will know it when you to smell it. The cows love it. Go figure. 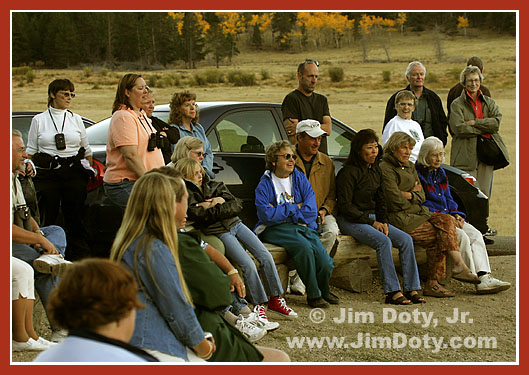 A group of park visitors is surprised to learn some of the details about the elk rut. A group of park visitors is surprised to learn some of the details about the elk rut.
Photo copyright (c) Jim Doty, Jr.Bulls also need to look big and dark. Size again comes with age, but the bulls help themselves out a bit by going to the "elk spa." They roll in the mud to coat themselves. The caked on mud makes them look bigger and darker, another plus with the cows. It isn't hard to find mud to wallow in, they can always make their own. You guessed it. More smell. Sound comes into play too. The more impressive the bugle, the better. Once again, the older, bigger bulls have the advantage. The younger bulls sound puny by comparison. Elk bugling can't really be described. A recording will give you something of an idea but you need to hear it in person to really appreciate it. There is nothing quite like that sound on a crisp fall evening. Bigger bulls can often intimidate smaller bulls with a look or a bugle. Sometimes they chase them away. With bulls closer in size it can come down to a pushing match, antler to antler. Sooner or later one pushes the other away. If the loser falls, it can be fatal. Big bulls are mean and will gore a fallen bull. The average bull hide at the time of death has 30-50 gore marks. 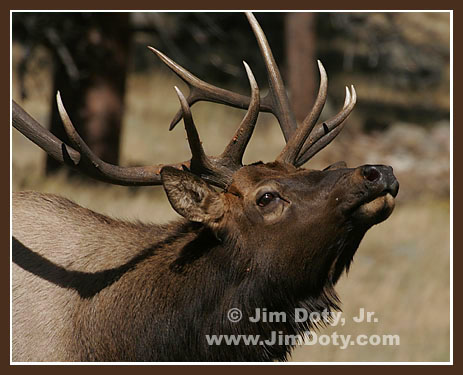 A bull elk right after running off some younger bulls, Rocky Mountain National Park, Colorado. A bull elk right after running off some younger bulls, Rocky Mountain National Park, Colorado.
Photo copyright (c) Jim Doty, Jr.All the work of impressing and protecting a harem for 6 weeks is hard on a bull. They can lose 1/3 of their body weight during the rut. Many of them die over the winter. At birth, males slightly outnumber the females. A few years later, there is only 1 male for every 3 females. A few years later and the number of males is a small fraction of the number of females. Life is hard on the bulls. The ranger drew a few parallels between bull elk and human males. Surely this isn't a fair comparison. After all, human males don't try to attract females by being impressive (fancy cars?), smelling good, looking buff, darkening their skin (tanning), or sounding good! Photographing the elk usually means low light. That means higher speed films or higher ISO digital settings. ISO 400, 800 or even 1600 is not unusual as it gets darker and darker. If you are lucky, the elk will be out during the day after a sudden drop in tempreature or a change in the weather. That is what happened this week while I was there. Elk are dangerous! Stay on the road and don't approach them. I heard a very foolish woman say "They're so tame" as she walked up to a young bull. Dumb. As someone once said, "Bull elk have two things on their mind in the fall, and you don't want to be on the receiving end of either one." The elk rut is quite a show and swarms of visitors come to RMNP in the fall to watch. Why not join them? 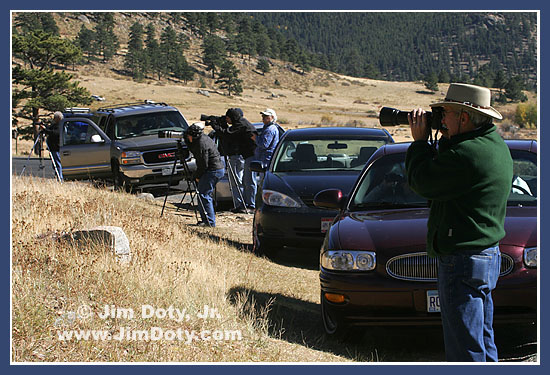 Photographers take advantage of a rare daytime opportunity to film a large herd of elk. Photographers take advantage of a rare daytime opportunity to film a large herd of elk.
Photo copyright (c) Jim Doty, Jr.
Friday, October 07, 2005
MARSHALL PASS ROAD, COLORADO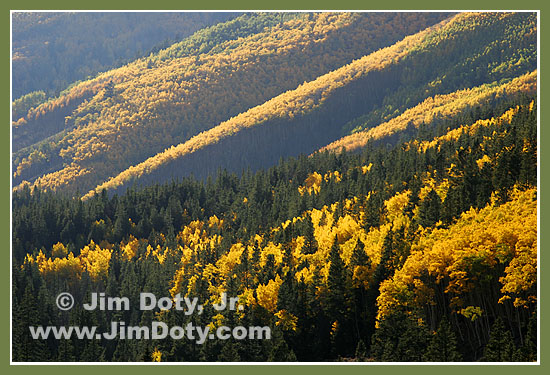 Aspen, Marshall Pass, Road, Colorado. Photo copyright (c) Jim Doty, Jr. Aspen, Marshall Pass, Road, Colorado. Photo copyright (c) Jim Doty, Jr.A prior post featured a photo from Marshall Pass Road in Southern Colorado. This is one of the most beautiful drives in Colorado if you are looking for fall color. When I was growing up, my family would go camping several times a year at O'Haver Lake, south of Poncha Springs. I would watch the rare vehicle drive by on the road up above the lake and wonder where the road went. It wasn't until I was married and had children of my own that we decided to find out. We drove the Marshall Pass Road for the first time. That must have been over 20 years ago. We were stopped before we reached the top by 20 foot snow drifts across the road. A second attempt a year or two later was successsful since we waited late enough in the summer for the snow to have melted. It has been a favorite drive of mine ever since. 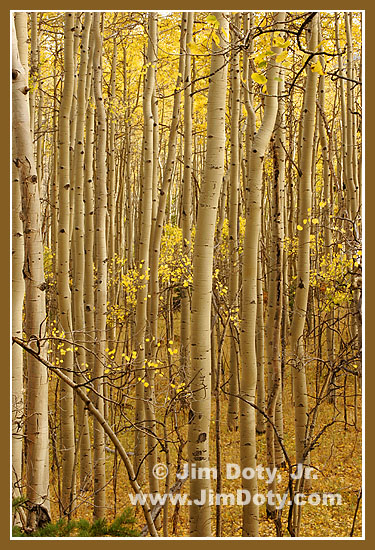 Aspen, Marshall Pass, Road, Colorado. Photo copyright (c) Jim Doty, Jr. Aspen, Marshall Pass, Road, Colorado. Photo copyright (c) Jim Doty, Jr.There are large stands of aspen at what seems like every turn in the road. It is a beautiful drive in the fall as the aspen turn gold. It is a good drive any time from mid-morning to late afternoon. Going from east to west, Marshall Pass Road leaves U.S. 285 a few miles south of Poncha Springs (take the O'Haver Lake Road, and then take Marshall Pass when the road splits). It crosses the Continental Divide on the south slopes of Mt. Ouray and connects with U.S. 50 at Sargents, Colorado. The road is passable (once the snow melts) by any passenger car or truck. 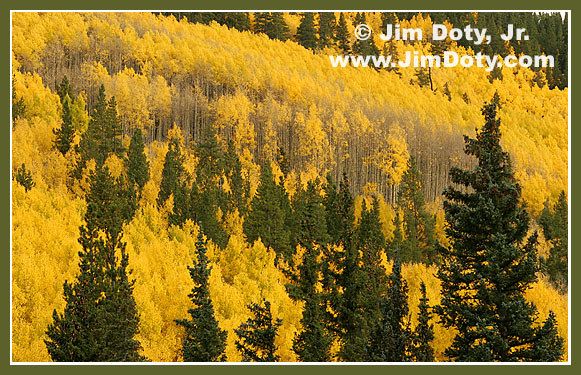 Aspen, Marshall Pass, Road, Colorado. Photo copyright (c) Jim Doty, Jr. Aspen, Marshall Pass, Road, Colorado. Photo copyright (c) Jim Doty, Jr.
Thursday, October 06, 2005
BE READY Coyote near Bear Lake Road, Rocky Mountain National Park, Colorado. Coyote near Bear Lake Road, Rocky Mountain National Park, Colorado.
Photo copyright (c) Jim Doty, Jr.Years ago, I read a book by Erwin Bauer that recommended having a camera and long lens ready to go when you are in locations that might provide brief opportunities to photograph wildlife. Not long after that, I was driving across the Texas panhandle and a coyote stopped right next to the road. I pulled over and looked at it and it stared at me for 10-15 seconds before it took off. I would have had a nice picture if my camera was ready, but it was zipped up in my camera bag. Not enough time to get it out before the coyote disappeared. Recently, I was in Rocky Mountain National Park, a prime wildlife location. My camera and long lens were laying on the car seat, ready to go. I spotted a coyote hunting near the road to Bear Lake. I pulled over, grabbed my camera and lens and took the above photo, one of seveeral before the coyote ran off. I have this photo only because I was ready for such a moment. As the Boy Scouts say, "Be Prepared." I didn't get my coyote photo in Texas years ago, but I did in Colorado. If you like to photograph wildlife, be ready when you are in a potential wildlife location. You might thank me some day. One more thing, Thank you Erwin Bauer!
Tuesday, October 04, 2005
BIGHORN SHEEP, HORSESHOE PARK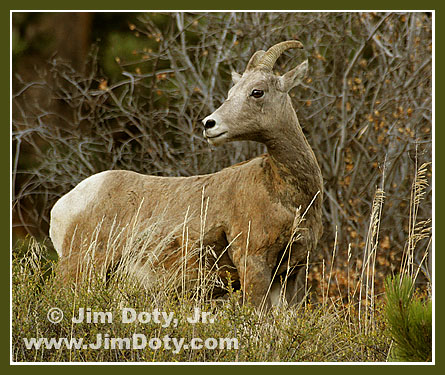 Bighorn Sheep Ewe, Horseshoe Park, Rocky Mountain National Park, Colorado. Bighorn Sheep Ewe, Horseshoe Park, Rocky Mountain National Park, Colorado.
Photo copyright (c) Jim Doty, Jr.Horseshoe Park is the most convenient place in Rocky Mountain National Park to see bighorn sheep - if they show up. Sheep Lakes at the east end of Horsehoe Park are high in mineral content and sheep come down periodically to "get their vitamins." This happens most frequently in the summer, but even in the summer this may only occur only a few times a week and they may not stay around long. A few years ago I met a professional photographer who had been at the Sheep Lakes viewing area every day for almost a week and had not spotted one sheep. On the last morning before he had to fly home (the day I happened to arrive) he decided to give it one more try. He showed up and over 40 sheep were there. He was overjoyed with his good fortune. So was I. This summer I spent three days in the Park and didn't see one sheep. One frustrated visitor, pretending he was the director on a movie set, yelled out "Cue the sheep." Part of the problem this summer was the presence of coyote's in the area. I saw one or more coyote's every day. The bighorn sheep were reluctant to come down to the lakes and risk the danger to their lambs. Bighorn sheep have one basic instinctive response to danger, climb fast and high. Unfortunately, that response leaves the young lambs behind and unprotected. Sheep sightings are more rare in the fall. They still come down to the lakes but less often than in the summer. When I arrived yesterday afternoon, I was quite pleased to see two ewes and two lambs. They weren't very big in my viewfinder. A man came up to me and asked if they were elk. I told him they were bighorn sheep. Then he proceeded to tell his son that they were two rams and two lambs since the female's don't have horns. Actually the ewes do have horns. Only the males get the big full curl. It was obvious when they wanted to cross the road and head back up the mountain. The rangers stopped traffic to let them cross. The good news is that they climbed only a small ways above the road and paused to feed in the grass, giving everyone there a chance at some nice photos (see above). Shutters fired like crazy. The sun had set by the time they crossed the road, so I set my camera at ISO 800. This allowed a fast enough shutter to minimize motion blur and also to stop down a bit for just a little more depth of field than shooting wide open at f5/6. If you come to Rocky Mountain National Park, be sure to check out Sheep Lakes on the eastern side of Horseshoe Park. More Colorado photos from this summer and fall are here. Posts about some of these photos are farther down the page in this blog. Canon 20D. Canon EF 100-400 IS lens at 400mm. Aperture: f/7.1. Shutter 1/160.
PHOTO OF THE DAY: MARSHALL PASS, COLORADO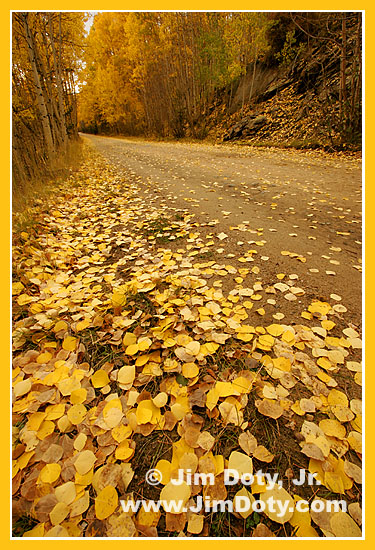 Aspen Leaves, Marshall Pass, Colorado. Photo copyright (c) Jim Doty,Jr. Aspen Leaves, Marshall Pass, Colorado. Photo copyright (c) Jim Doty,Jr.
It was a beautiful fall day on Marshall Pass, in southern Colorado. Aspen leaves were beginning to blanket the road. To emphasize the fallen leaves, the camera and lens were placed low to the ground. A 10mm focal length was used to give a very wide angle of view (equivalent to 16mm on a 35mm film camera) . The aperture was f/22 to maximize depth of field. Canon 20D, Canon EF-S 10-22mm lens at 1omm. Aperture: f/22. Shutter: 1/8 second.
Monday, October 03, 2005
PHOTO OF THE DAY: WET MOUNTAIN VALLEY, COLORADO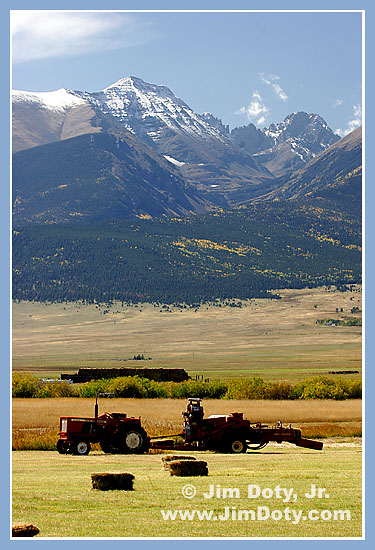 Wet Mountain Valley, Marble Mountain, Crestone Needle, Crestone Peak. Wet Mountain Valley, Marble Mountain, Crestone Needle, Crestone Peak.
Photo copyright (c) Jim Doty, Jr.The Wet Mountain Valley in southern Colorado is sandwiched between the Wet Mountains on the east and the Sangre de Cristo ("Blood of Christ") Mountains to the west. It is a beautiful place to take pictures. The whole Sangre de Cristo range rises dramatically from the valley floor and is quite spectacular, especially when snow covered. Pictured above is a small slice of the range. Canon 20D camera. Canon EF 28-135mm IS lens at 105mm. Aperture: f/11. Shutter: 1/30.
BEAR BASIN RANCH, SOUTHERN COLORADO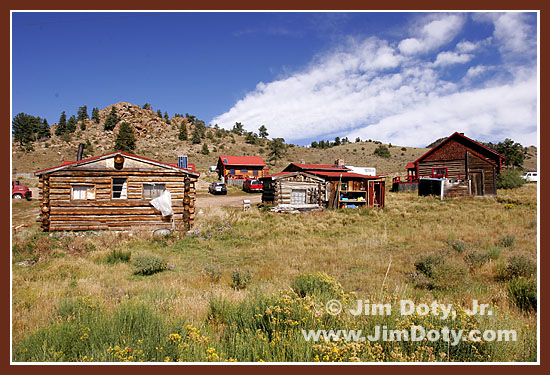 Bear Basin Ranch, Westcliffe, Colorado. Photo copyright (c) Jim Doty, Jr. Bear Basin Ranch, Westcliffe, Colorado. Photo copyright (c) Jim Doty, Jr.Last Friday, I was in southern Colorado taking pictures with Bob Walker, my brother-in-law and photo buddy. After taking pictures in the Wet Mountain Valley and the Sangre de Cristo mountains, we headed to Westcliffe for lunch. Westcliffe is a small, delightful, mountain valley town with a population that is around 460 and growing. 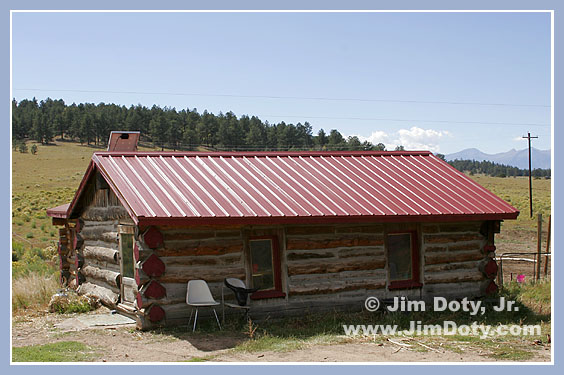 Cabin, Bear Basin Ranch, Westcliffe, Colorado. Photo copyright (c) Jim Doty, Jr. Cabin, Bear Basin Ranch, Westcliffe, Colorado. Photo copyright (c) Jim Doty, Jr.We stopped a cowboy on Main Street (one look and you knew he was the real deal) and asked him about a good place to eat. (We learned later his name is Ryan.) He sent us to Poag Malone's and said their ruben sandwich was good. He was right - the food was great. If you are in Westcliffe, it is a good place to eat. Coincidentally, Dory who waited on us at Poag Malone's, is Ryan's girlfriend. She asked what we were doing in Westcliffe. When we told her we were taking pictures, she invited us to visit the Bear Basin Ranch 11 miles east of town and take some pictures. 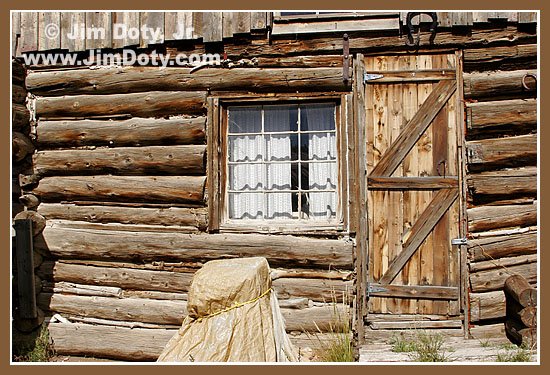 Bear Basin Ranch, Westcliffe, Colorado. Photo copyright (c) Jim Doty, Jr. Bear Basin Ranch, Westcliffe, Colorado. Photo copyright (c) Jim Doty, Jr.After taking some pictures south of town, we headed out to the ranch. We are glad we did. This is a real and rustic ranch, complete with a pair of "little houses out back" which are shared by everyone living and working on the ranch. In an interesting combination of the new mixed in with the old, electricity at the ranch is provided by solar collectors on some of the roofs. The ranch is located in the rolling hills at the eastern edge of the Wet Mountain Valley, with a view of the Sange de Cristo Mountains to the west. By the time we arrived, Ryan was back at the ranch. He is the manager of the horse ranch part of the operation. We also met Dave, Michelle, Bob, and Phyllis who are responsible for all the events that go on at the ranch. We spent some time learning about the packtrips, hunting, photography, and other events sponsored by the the ranch. Then we wandered around and took some photos. 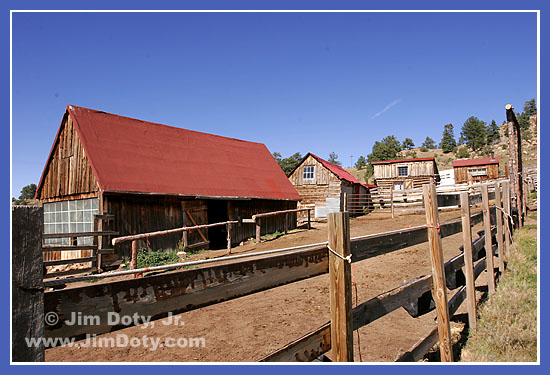 Bear Basin Ranch, Westcliffe, Colorado. Photo copyright (c) Jim Doty, Jr. Bear Basin Ranch, Westcliffe, Colorado. Photo copyright (c) Jim Doty, Jr.We were invited into one couple's home, a 300 square foot, one room cabin. Our host pointed out the office in one corner, the bedroom in another, and the kitchen and living room on the other side of the room. All the comforts of home in one room. The photo below was taken from the kitchen/living room, looking toward the office (left) and bedroom (right). You can see the loft over the office and bedroom. We enjoyed the wonderful hospitality that was extended to us. We were invited to take pictures inside the cabin. I took a couple of still shots and I did one panorama that I will stitch together when I get to my computer at home. If you think about it a bit, it is pretty remarkable for someone to invite two strangers into their home and invite them to take pictures. It reminded me of a simpler and more trusting time. 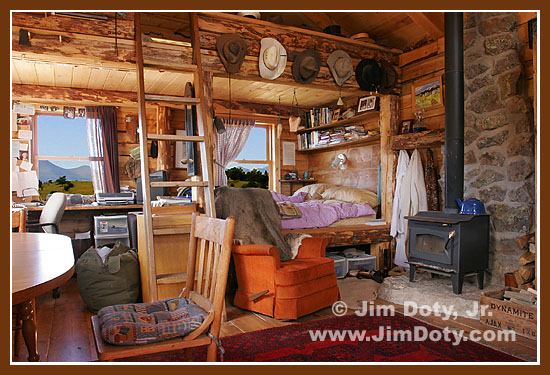 Cabin, Bear Basin Ranch, Westcliffe, Colorado. Photo copyright (c) Jim Doty, Jr. Cabin, Bear Basin Ranch, Westcliffe, Colorado. Photo copyright (c) Jim Doty, Jr.After our enjoyable visit, it was time to head down the road. We were grateful that a chance meeting in Westcliife led to an invitation to visit a working horse ranch. I'm sorry I have no horse photos, the horses were all elsewhere on the 5,000 acre ranch at the time of our visit. I would love to go back for one of the roundups. You can learn more about the packtrips at Bear Basin by going here and learn about the new photography shoot outs here. They also have rock climbing, horseback riding, whitewater rafting, hiking, and camping for singles, couples, families, and groups. Bob and I send our thanks to all the friendly folks at Bear Basin for all of the hospitality extended to us. My apologies if I didn't get someone's name right. You can learn more about Westcliffe, Colorado here, here, here, and here. 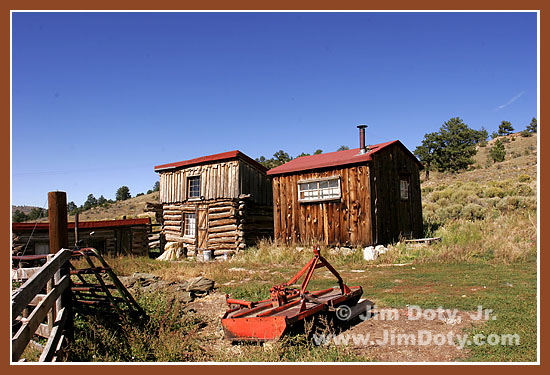 Bear Basin Ranch, Westcliffe, Colorado. Photo copyright (c) Jim Doty, Jr. Bear Basin Ranch, Westcliffe, Colorado. Photo copyright (c) Jim Doty, Jr.
Saturday, September 24, 2005
YOU CAN HELP - PART TWO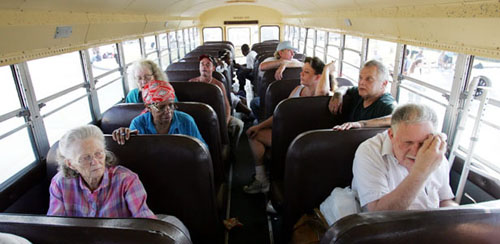 Galveston residents wait in a broken down bus to be evacuated from Galveston, Texas, as Hurricane Rita heads for the Texas Gulf Coast on Thursday. AP Photo/David J. Phillip. Galveston residents wait in a broken down bus to be evacuated from Galveston, Texas, as Hurricane Rita heads for the Texas Gulf Coast on Thursday. AP Photo/David J. Phillip.Just a few weeks after Hurricane Katrina devasted the Gulf coast, Hurricane Rita has hit land. Fortunately, Hurricane Rita has not been nearly as costly in terms of lives lost, but there has been a lot of property damage and a lot of people have been displaced. Help is needed for the victims of both hurricanes.  Give to the American Red Cross, the Salvation Army, or the charity of your choice that is doing relief work in the aftermath of both hurricanes. 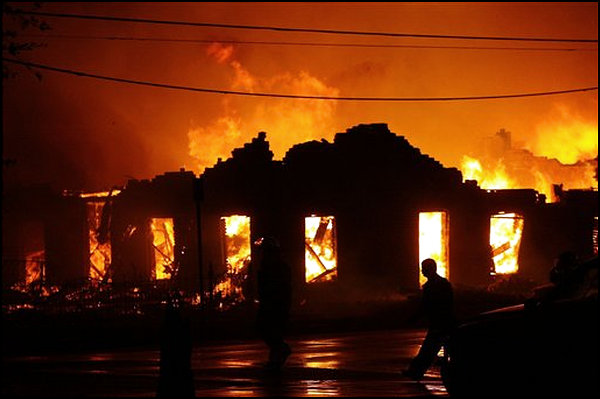 A fire burns in downtown Galveston, Texas as Hurricane Rita approaches the coast Friday, Sept. 23, 2005. AP Photo/David J. Phillip. A fire burns in downtown Galveston, Texas as Hurricane Rita approaches the coast Friday, Sept. 23, 2005. AP Photo/David J. Phillip.
Friday, September 16, 2005
PHOTO OF THE DAY - INDIAN PEAKS WILDFLOWERS 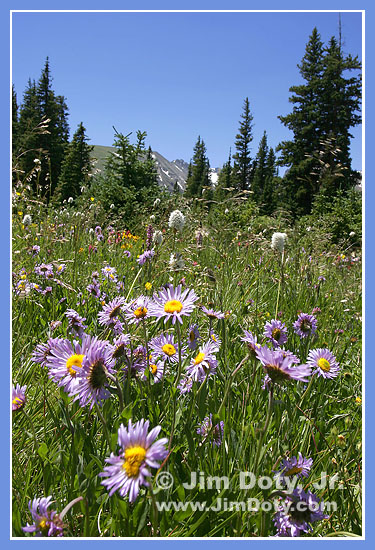 Wildflowers Near Long Lake, Indian Peaks, Colorado. Wildflowers Near Long Lake, Indian Peaks, Colorado.
Photo copyright (c) Jim Doty, Jr.Indian Peaks near Ward, Colorado (west of Boulder) is a beautiful area for hiking, camping, fishing, and photography. These wildflowers were filmed in mid-July, not far from the trail that goes around the southeast side of Long Lake. The meadows all along the southeast side of the lake were filled with flowers. To get to this area, go just north of Ward on Colorado 72 and turn west on the road to the Brainard Lake Recreation Area (there is a modest entry fee). The road will take you past Red Rock Lake (see photos in the July 24 and July 19 posts below) and on to Brainard Lake and the Longs Lake parking area. The hike from the parking area to Long Lake is a short one. The Indian peaks form a majestic backdrop to all of these lakes. Trails lead up into the Indian Peaks Wilderness. Trailer camping is available at Brainard Lake. This is one of my favorite areas in Colorado. Canon 20D, Canon EF 17-40mm lens at 17mm in focal length. Aperture: f/16. Shutter: 1/100 second.
Sunday, September 04, 2005
JEWEL-BOX LIGHTING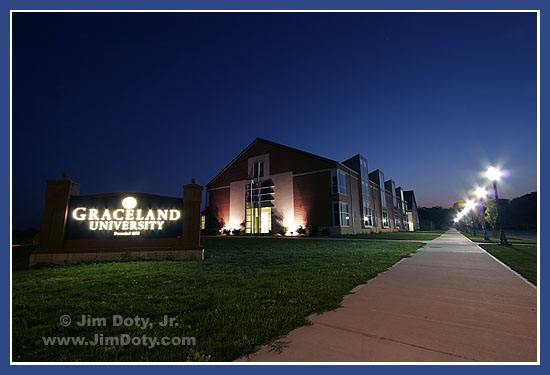 Center for the Visual Arts. Center for the Visual Arts.
Photo copyright (c) Jim Doty, Jr."Jewel-box lighting" is a technique for photographing lighted buildings in late evening light so it looks like night but there is some color left in the sky. It works best if the exterior of the building is at least partially lit by flood lights. The technical challenge is to balance the lighting on the building with the deep blue of the sky. The usual approach is to meter the building and the sky and wait until the sky is one or two stops darker than the brightest part of the building. Then take pictures every few minutes based on an exposure for the lightest part of the building (and bracket exposures). When the film comes back, choose the most pleasing sky and building exposure combination. Digital makes this easier since you can view the results as you take the pictures. I was asked to photograph the Center for the Visual Arts and decided to use the jewel-box technique. I began by taking pictures and experimenting with composition while the sky was still too light. Once I had an arrangement I liked between the buidling, the sign, the sidewalk, and the street lights, I took a bracketed set of images every few minutes until the sky was too dark. The exposure balance is good in this image except for the sign which is a bit hot. When I get home to my primary computer (and a more accurate monitor), I can strip in a darker exposure of the sign for a better balanced image. I've written more about jewel box lighting here. Tech info: Canon 20D, Canon EF 10-22mm lens at 10mm (equivalent to a 16mm field of view with a 35mm film camera). Aperture: f/11. Shutter: 8 seconds.
Friday, September 02, 2005
YOU CAN HELP! A rescued baby cries in the arms of a policewoman after being brought to land on a boat from floodwaters in New Orleans September 1, 2005. (Jason Reed/Reuters) A rescued baby cries in the arms of a policewoman after being brought to land on a boat from floodwaters in New Orleans September 1, 2005. (Jason Reed/Reuters)You can help. Give to the American Red Cross, the Salvation Army, or the charity of your choice that is doing relief work in the aftermath of Hurricane Katrina. 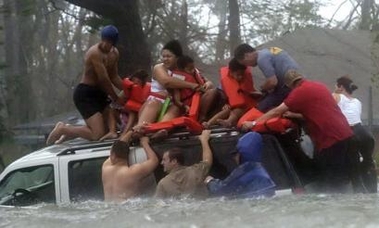 Bay St. Louis Emergency Management Agency volunteer crews rescue the Taylor family from the roof of their suburban, which became trapped on US 90 due to flooding during Hurricane Katrina on Monday, Aug. 29, 2005, in Bay St. Louis, Miss. (AP Photo/Ben Sklar) Bay St. Louis Emergency Management Agency volunteer crews rescue the Taylor family from the roof of their suburban, which became trapped on US 90 due to flooding during Hurricane Katrina on Monday, Aug. 29, 2005, in Bay St. Louis, Miss. (AP Photo/Ben Sklar)
|